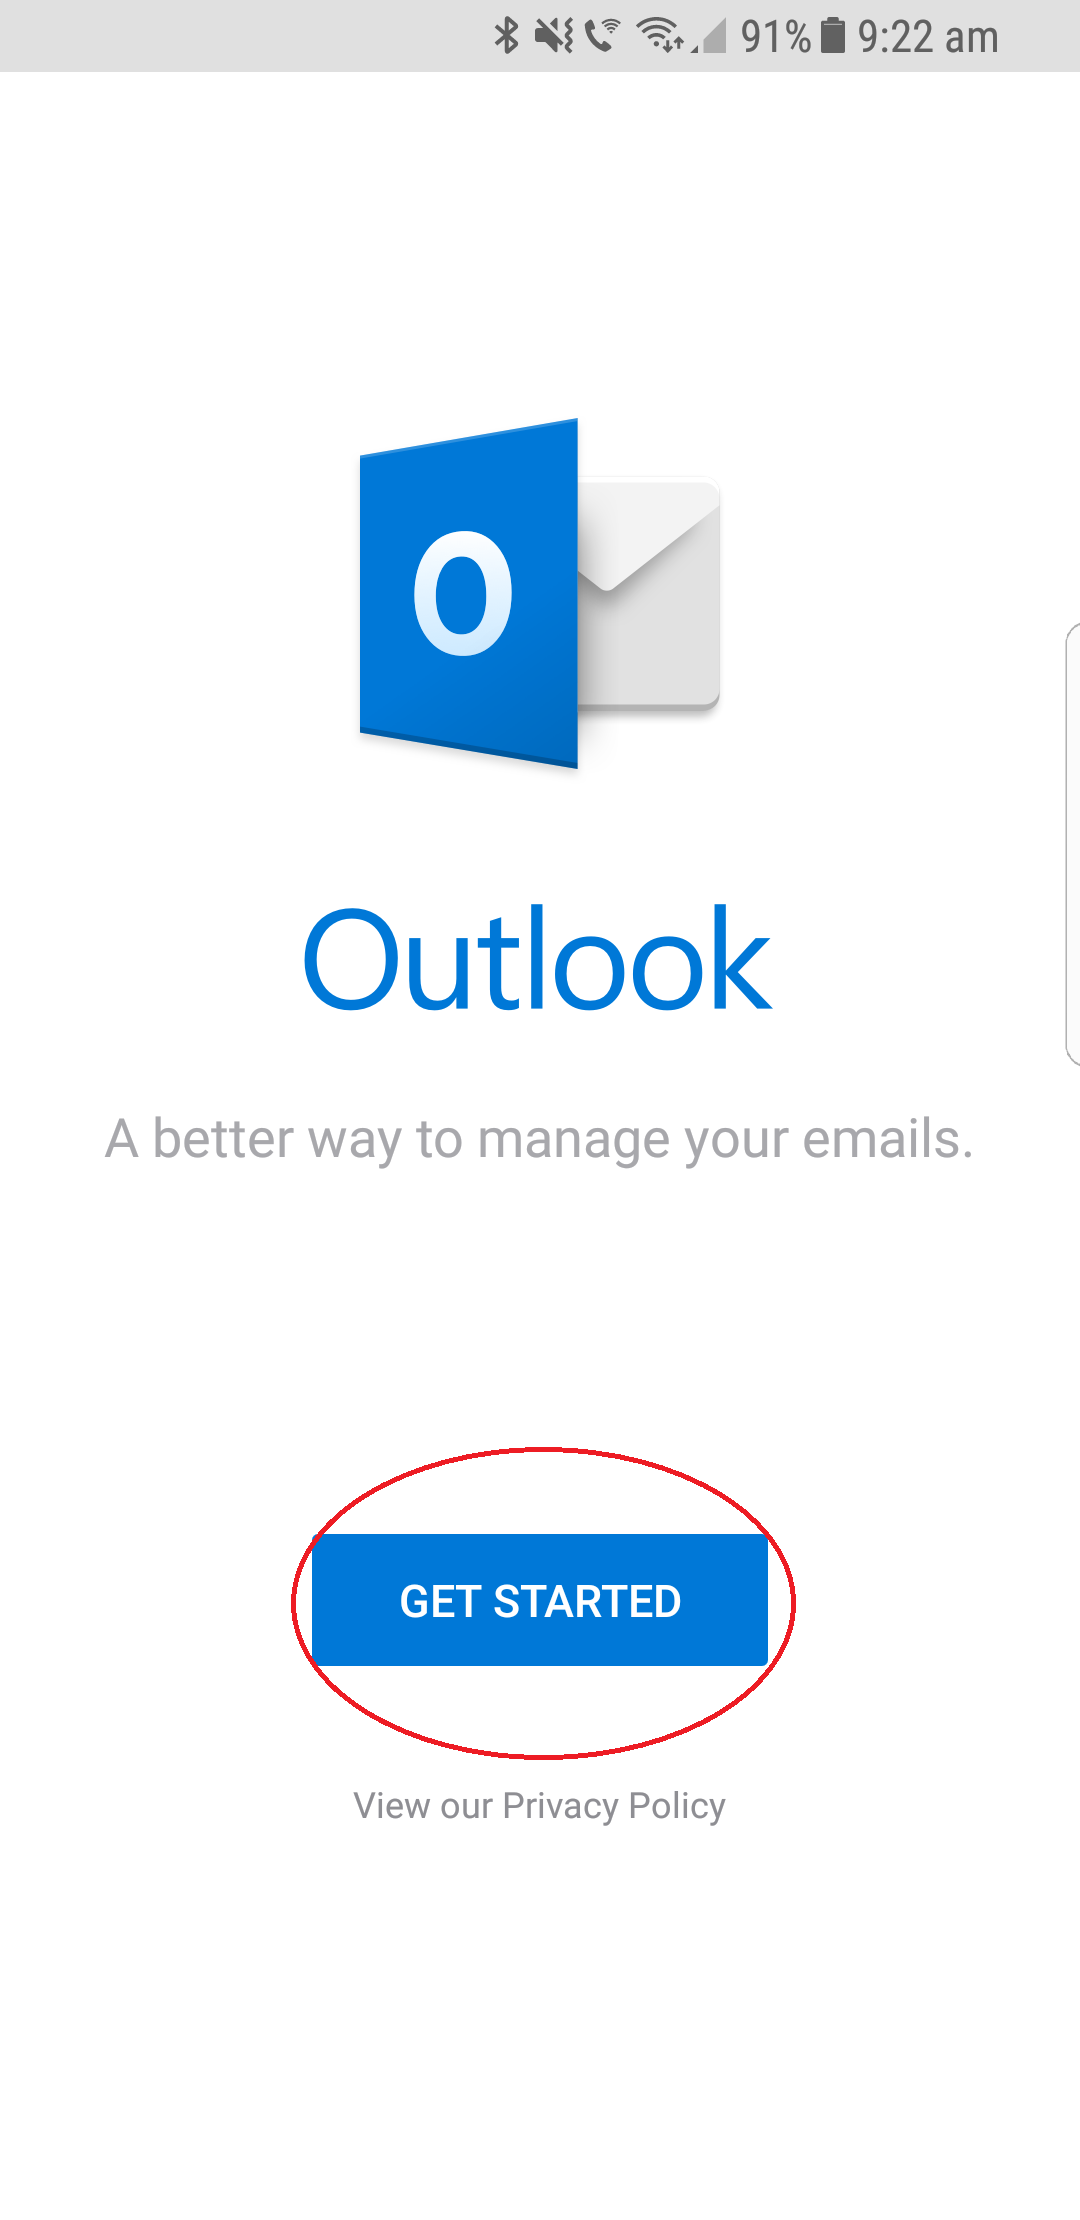
Nitec Multi-Factor Authentication Guide
This guide will help you enable Multi Factor Authentication.
This is by far the best security upgrade you can give yourself this year.
Attackers are furiously trying to get at your passwords and this stops them in their tracks.
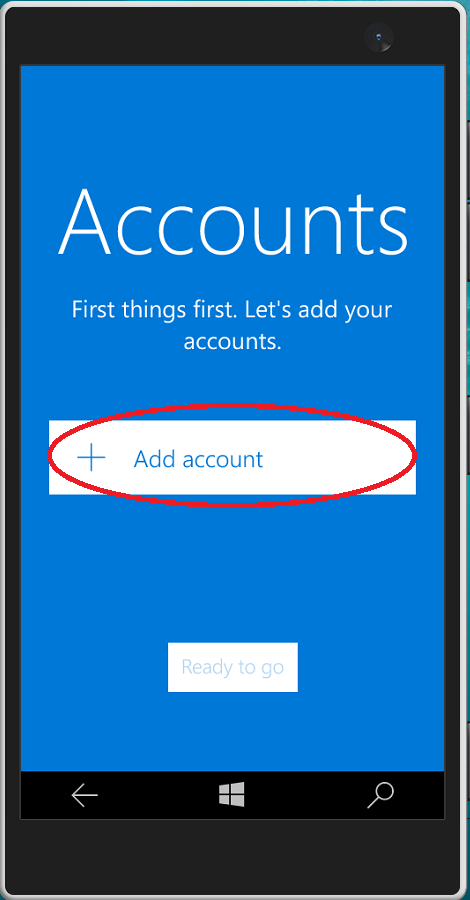
App Password Email Setup
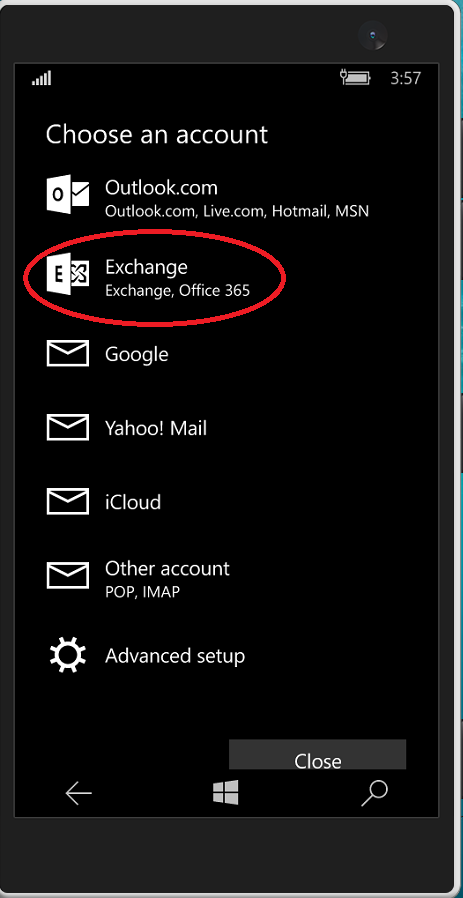
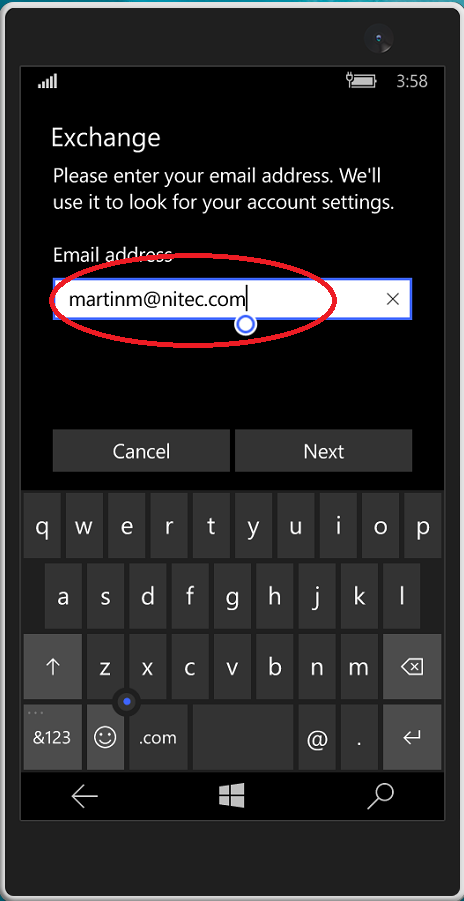
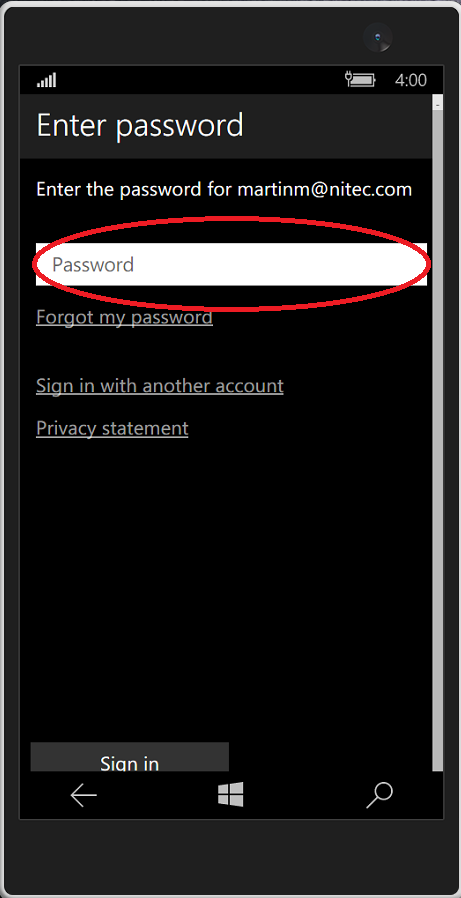
Sign In
In order to enable Multi Factor you need to go to https://portal.office.com.
Once there you will see this page:
Password page
Once you have entered your username you should be directed to the password page.
The password page is not shown here but once you have entered your password you will see this page below:
Choose "Set it up now" and continue.
MFA Options
On this page you can make a choice as to which type of 2 Factor authentication suits you.
Text Message is easier to set up but has some drawbacks
Phone App will take about 1 or 2 minutes longer to set up but has some advantages
1) The App is more secure
2) The App can work even if you have no internet access or cell signal. Very useful at times.
Just to be clear we recommend the Phone App but we understand for various reasons its not always possible.
Choose your method:
Authenticator App
The Microsoft Authenticator App is available on a range of mobile devices.
Choose your device:
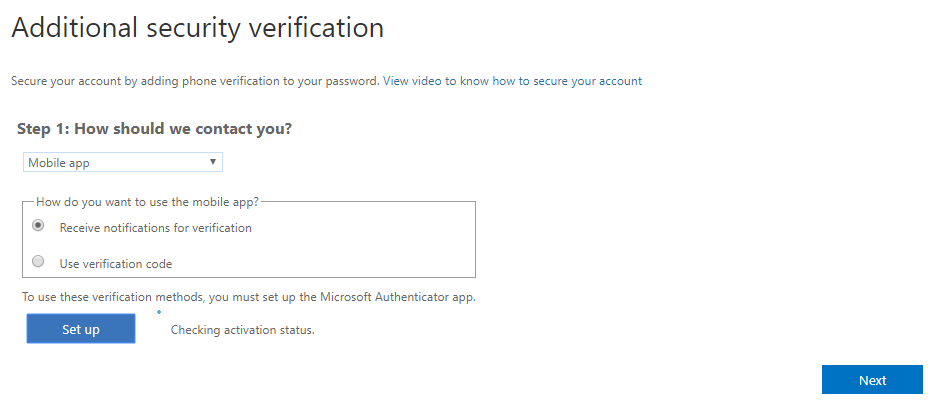
Security Verification
You should be looking at a page similar to the one below.
“Receive notifications” is simpler but the “use verification code” is slightly more secure. The choice is yours.
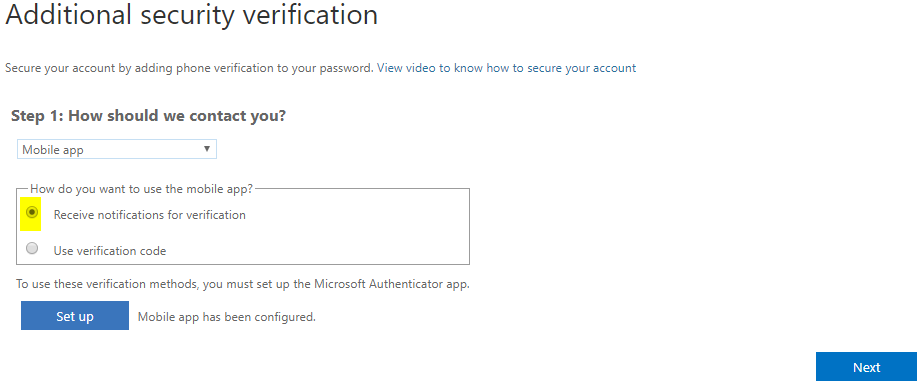
Make sure you have chosen Mobile app in the dropdown, made you choice, and then choose "Set up" or "Configure".
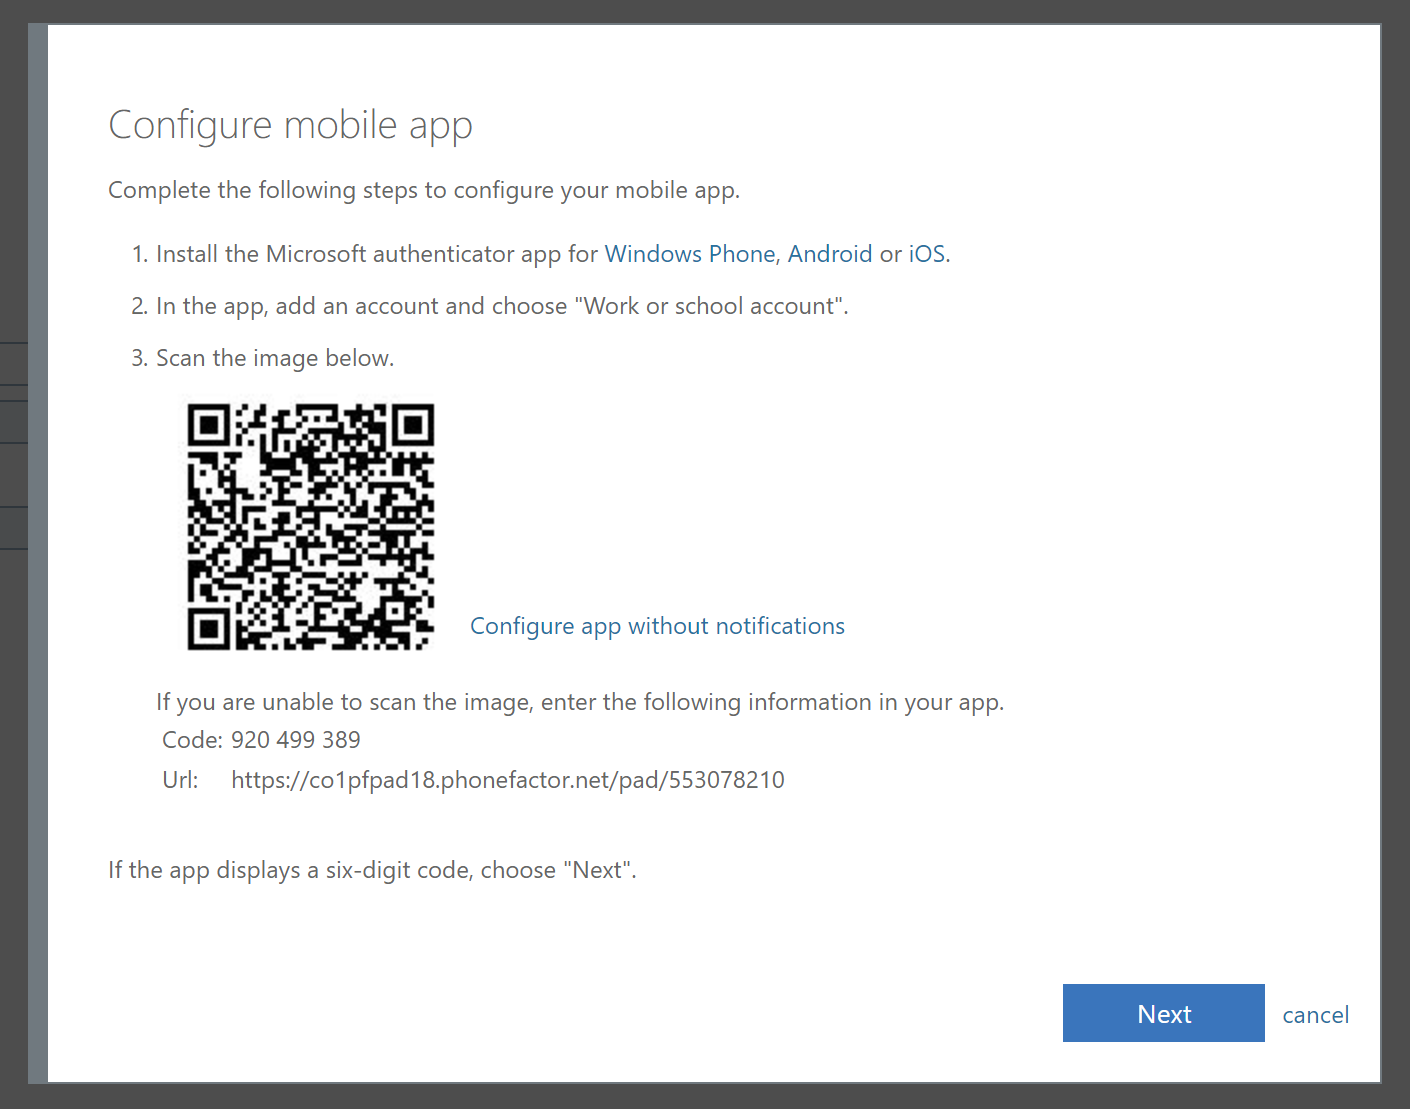
Back NextActivation Step
You now have a bit of work to do on your mobile phone.
Leave the QR code page sitting in the background and we will come back to it shortly.
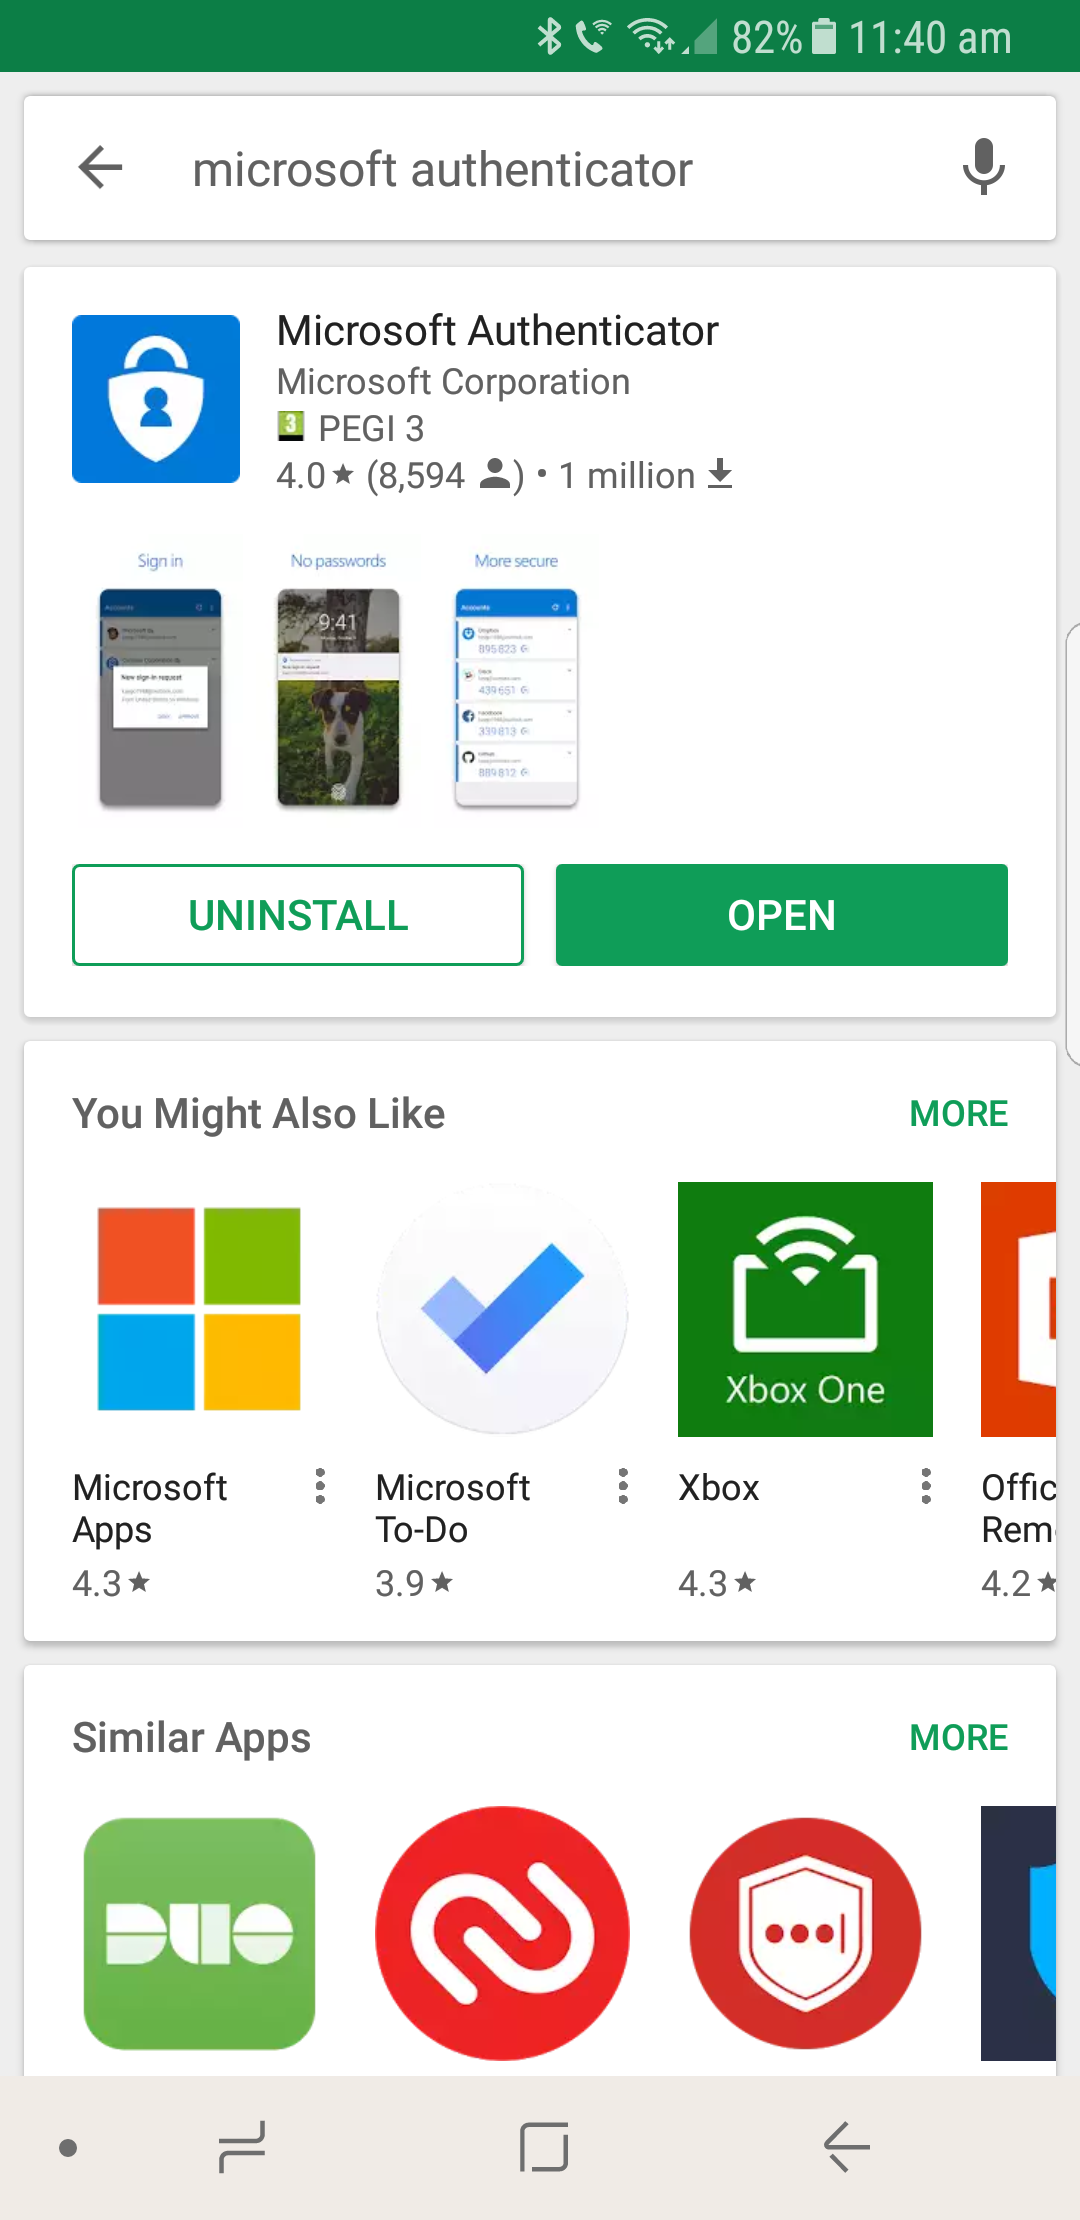
App Download
Go to the App Store on your device of choice, normally Google Play Store or Apple App Store.
Once there you need to search for Microsoft Authenticator App ![]() .
.
You should see something resembling the screen below.
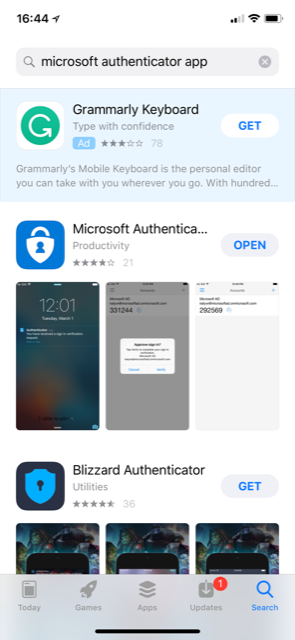
You need to install this as you would any other app and open it once installed.
Back NextActivation Step 1
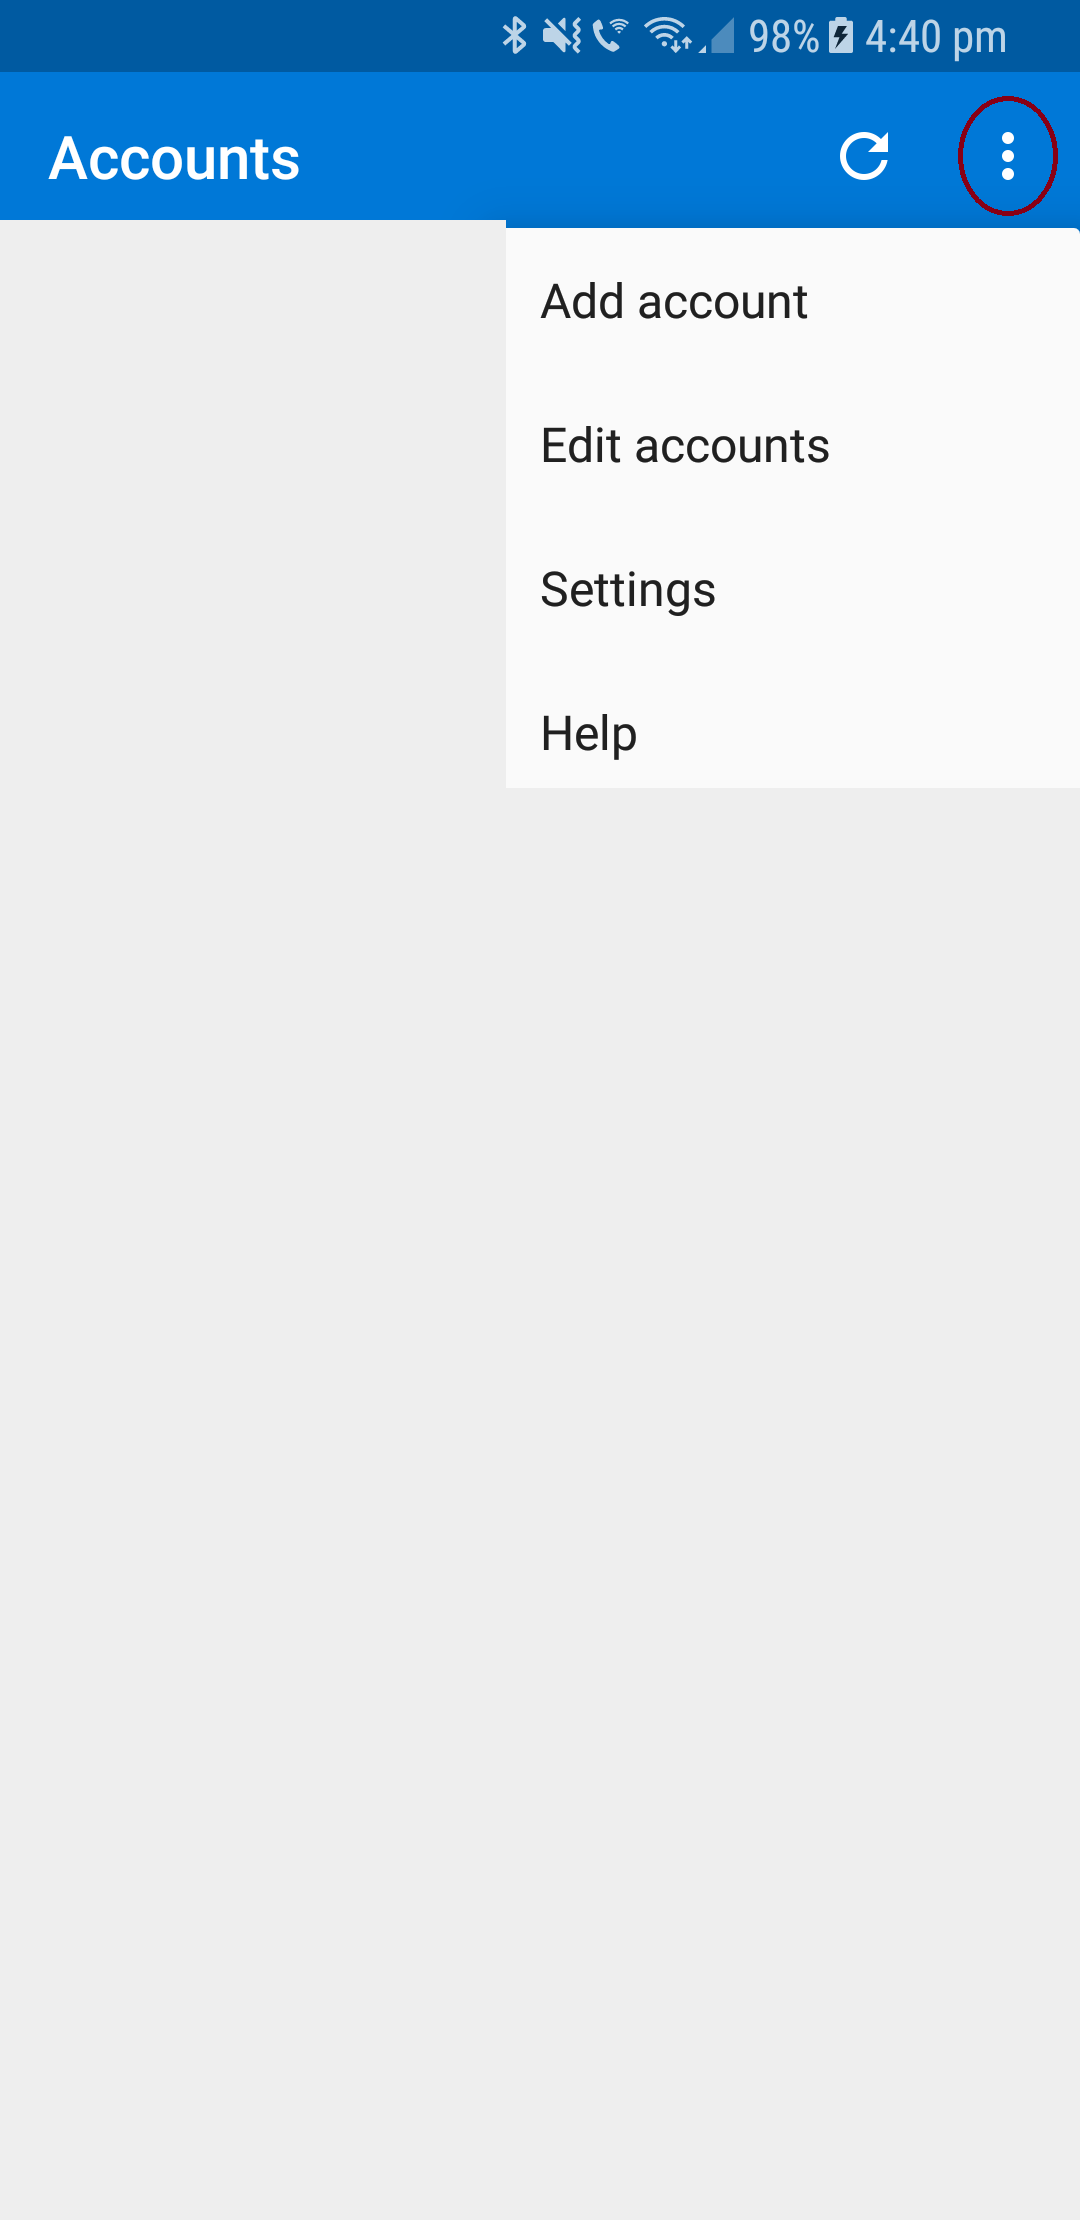
Press the "+" button in the top right corner under the battery level indicator.
Yours will be empty. Mine has a number of other emails, all secured by two factor.
At least its clear we eat our own dog food. We're not asking you to do something we don't do ourselves.

Activation Step 2
Choose Work or School Account.
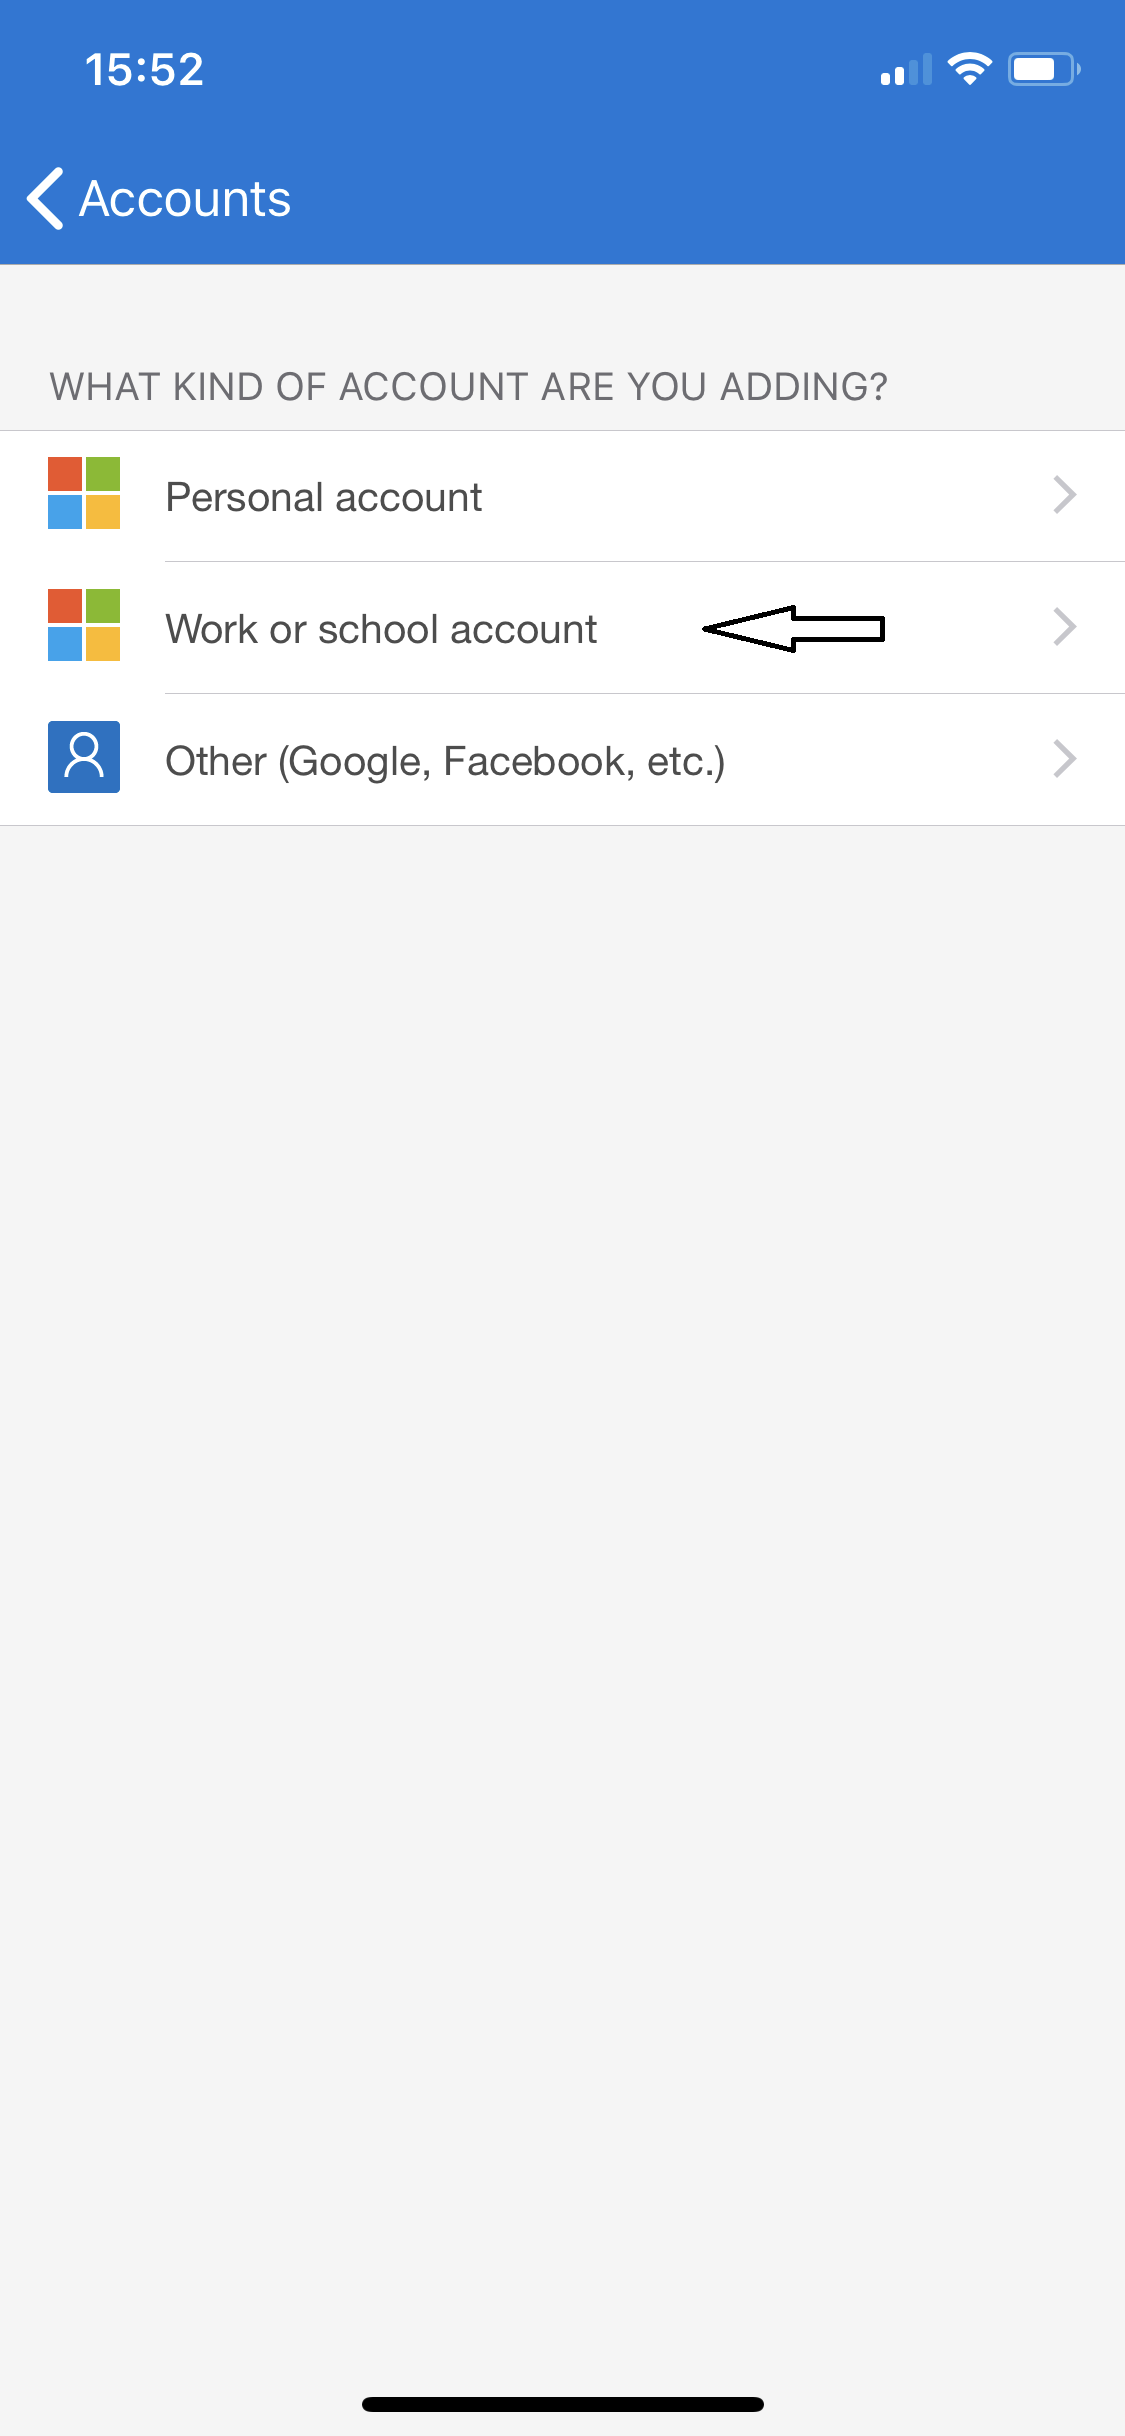
If you have not used this app before you may get prompted for "Allow Camera Access".
You need to allow this for it to work.
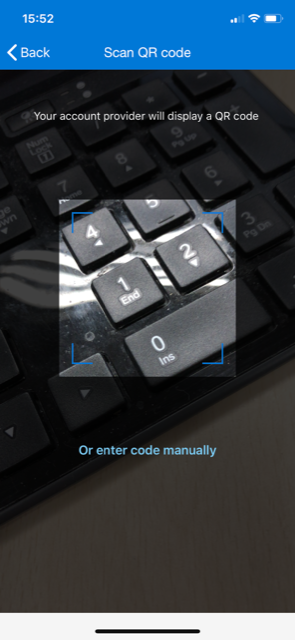
All that remains is to point your phone camera at the screen and something should start to happen.
Back NextActivation Step 3
All that remains is to point your phone camera at the screen and something should start to happen.
You can click on here to see the following screens. You can come back if you go too far.
Back to your computer
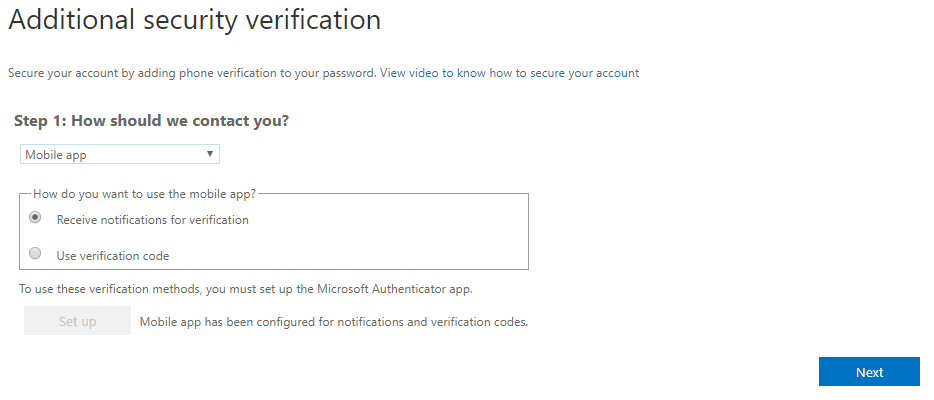
You'll see the little Microsoft spinner saying checking activation status.
Security Verification
You should be looking at a page similar to the one below.
“Receive notifications” is simpler but the “use verification code” is slightly more secure. The choice is yours.
Make sure you have chosen Mobile app in the dropdown, made you choice, and then choose "Set up" or "Configure".
Back NextActivation Step
You now have a bit of work to do on your mobile phone.
Leave the QR code page sitting in the background and we will come back to it shortly.
App Download
Go to the App Store on your device of choice, normally Google Play Store or Apple App Store.
Once there you need to search for Microsoft Authenticator App ![]() .
.
You should see something resembling the screen below.
You need to install this as you would any other app and open it once installed.
Back NextActivation Step 1
Press the
A menu will appear and you should select "Add Account"
Activation Step 2
Choose Work or School Account.
If you have not used this app before you may get prompted for "Allow Camera Access".
You need to allow this for it to work.
All that remains is to point your phone camera at the screen and something should start to happen.
Back NextActivation Step 3
All that remains is to point your phone camera at the screen and something should start to happen.
You can click on here to see the following screens. You can come back if you go too far.
Back to your computer
You'll see the little Microsoft spinner saying checking activation status.
Setup Complete!
You are finished setting up Multi Factor Authentication
You may need to setup Email on you mobile device
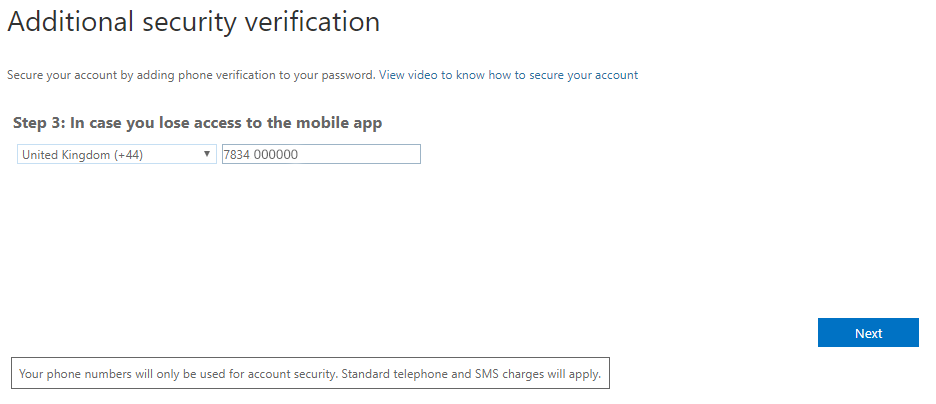
Phone SMS Setup
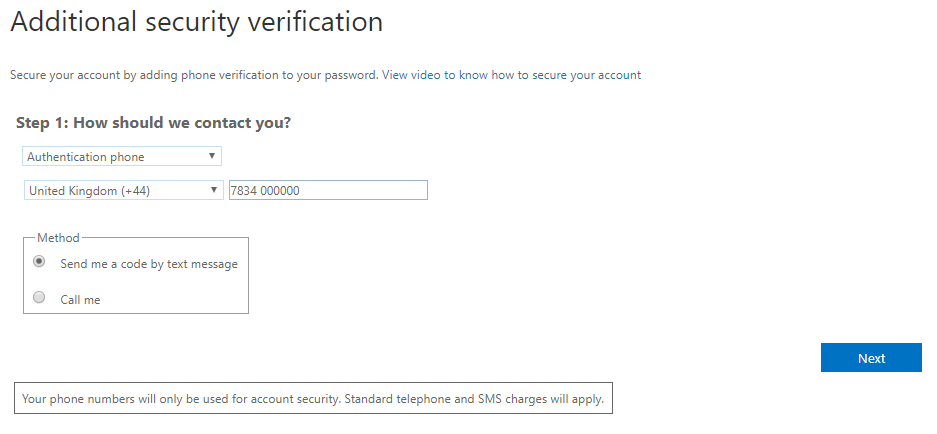
Make sure that you have selected Authenication Phone in the first drop down box.
Select "Send me a code by text message", and enter your country code and mobile number (without the zero). Press Next.
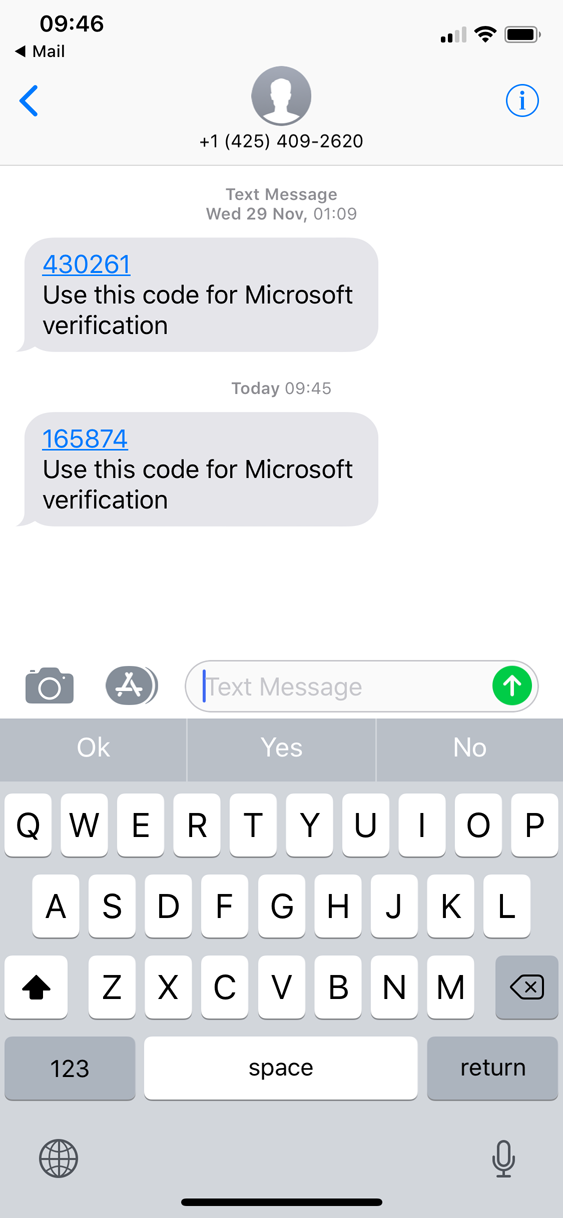
Back NextConfirmation Message
You will get a message as below on your phone. Remember this code for next page.
Pair Phone
Type the code you have copied/remembered from your phone into this page, as below picture.
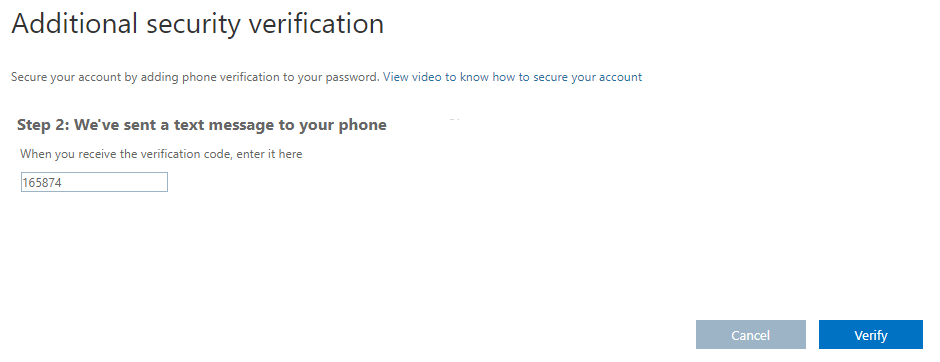
Choose verify once you get type the code.
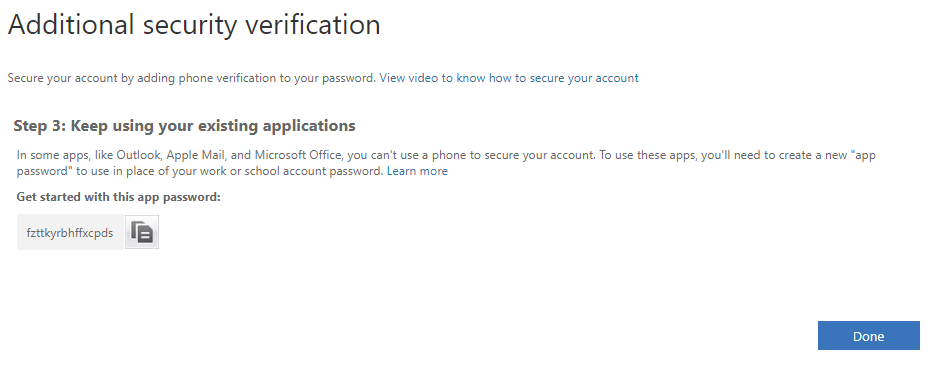
Back NextImportant Information
And Relax!. You need to go slow here or you might make a mistake. Please pay attention to these options
We recommend using the Outlook Mobile App,![]() but you dont have to. You can use the native email
but you dont have to. You can use the native email![]() or
or ![]() on your phone.
on your phone.
Why would I use Outlook
- It understands 2 Factor.
- It has some additional features that native email doesnt have.
Depending on the app you use or would like to use for your mobile email there are slightly different steps involved in setup.
Make your choice below:
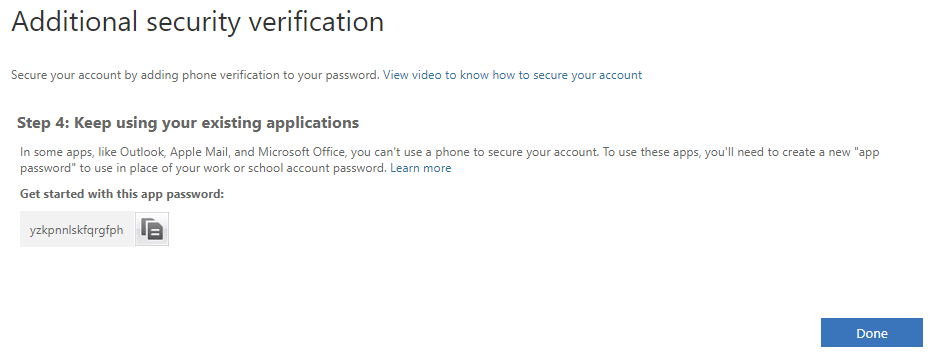
Configure Email to Use Multi Factor
The next page will show you the app password and given you aren’t meant to write it down it makes sense to set your email up now. Or use Outlook of course. We really recommend you at least try Outlook before you decide you don’t like it. It has improved beyond recognition and I actually prefer it now but each to their own.
Choose your brand of Mobile Phone below.
Note: This should give you a good idea of configuration steps but there are 100 different versions out there so it may not be exactly correct. If you struggle call our helpdesk.
Back iPhone Android Windows Phone I don't use Mobile EmailConfigure Email to Use Multi Factor
The next page will show you the app password and given you aren’t meant to write it down it makes sense to set your email up now. Or use Outlook of course. We really recommend you at least try Outlook before you decide you don’t like it. It has improved beyond recognition and I actually prefer it now but each to their own.
Choose your brand of Mobile Phone below.
Note: This should give you a good idea of configuration steps but there are 100 different versions out there so it may not be exactly correct. If you struggle call our helpdesk.
Back iPhone Android Windows Phone I don't use Mobile Email

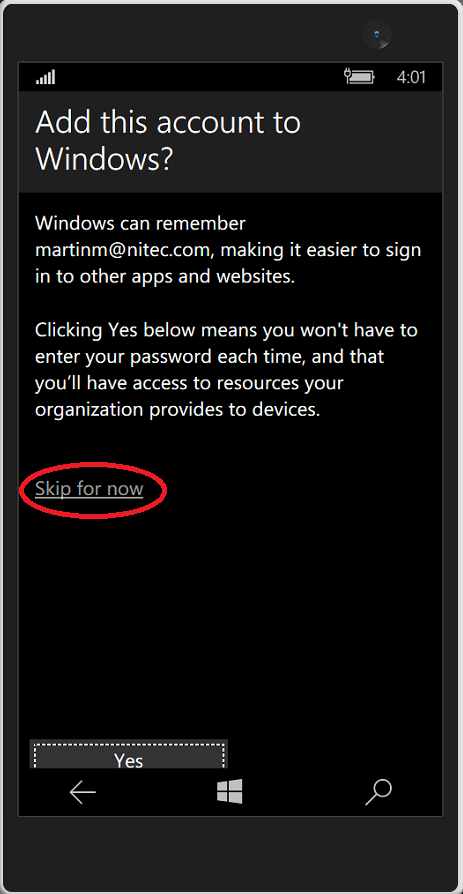
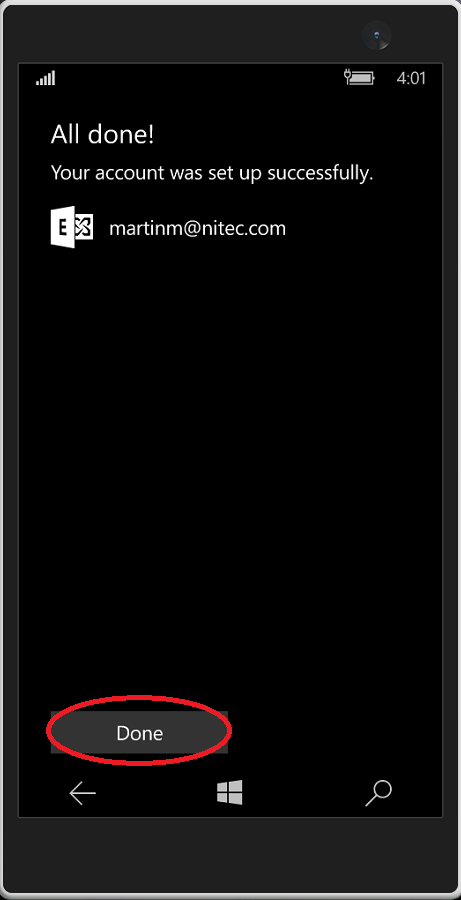
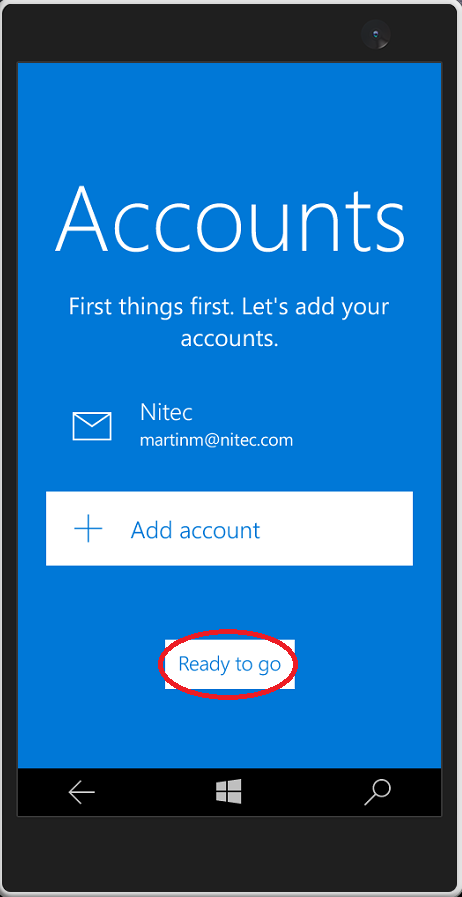
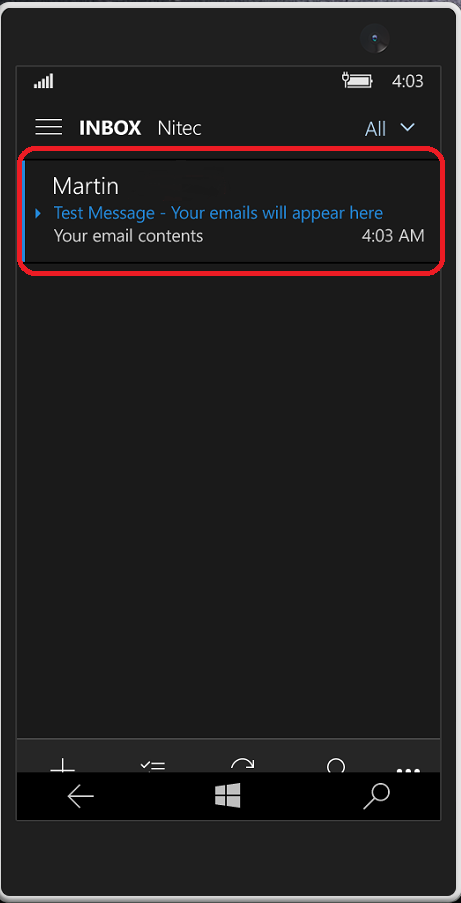
Windows Phone - Outlook Email Setup
You will now see all of your incoming emails appear here
iPhone Outlook Mail Setup
If you are already using mobile email chose Existing. If this is your first time to use mobile email choose Set up new.
Step 1 - Remove Old Account (Pre 2-Factor Activation)
Now you have added 2-Factor Authentication to your account.
You now need to remove you old mail account and re add it to your phone
To begin tap the menu button
Step 3 - Remove Old Account (Pre 2-Factor Activation)
You'll see a list of you're active email accounts
Select the one you need to delete

Step 1 - Setting Up Outlook
The outlook app is the most secure method of accessing your files via your mobile phone. The outlook app has been designed especially for Office 365 and allows for Two Factor Authentication.
To begin tap 'Get Started'
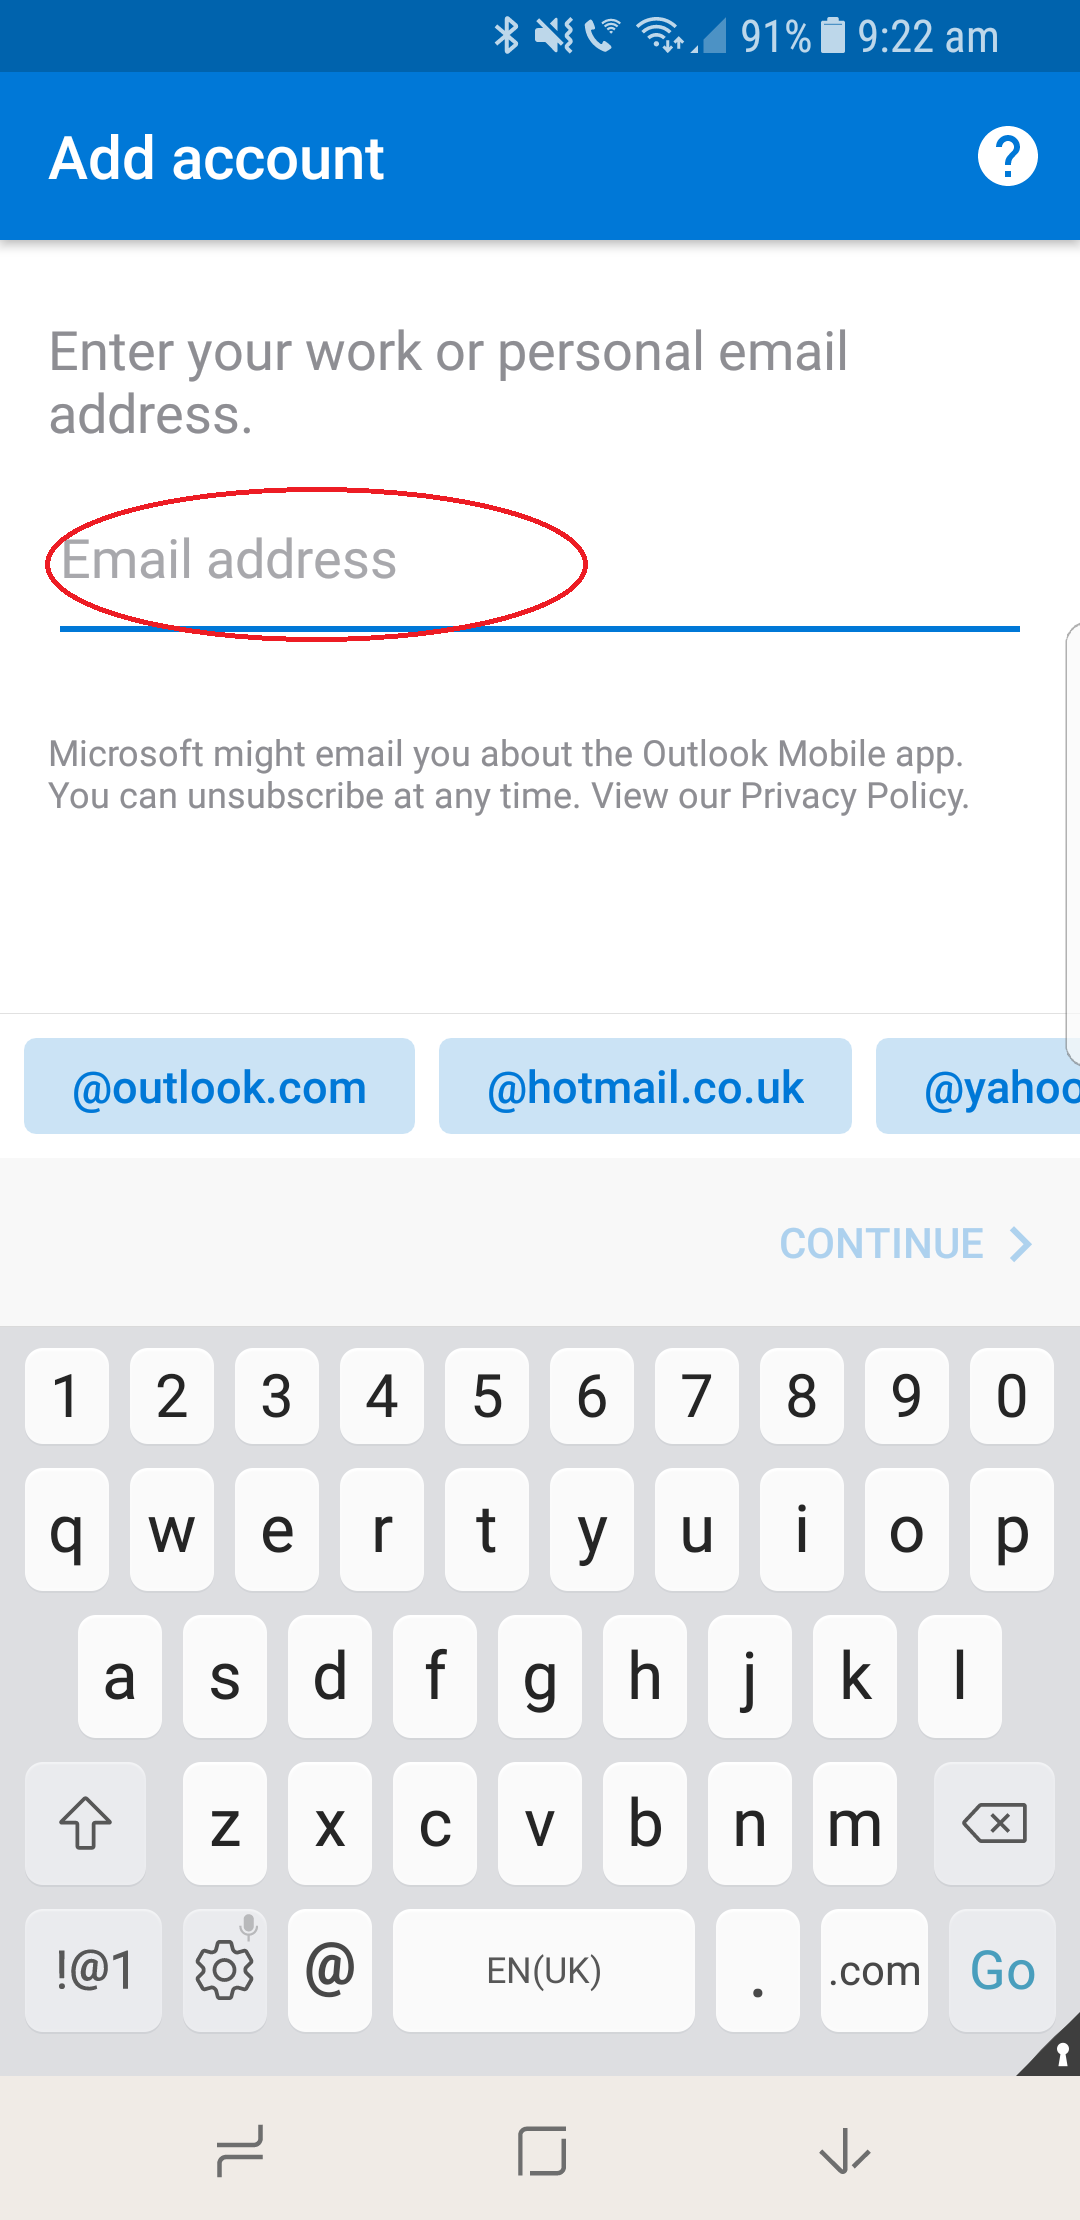
Step 2 - Setting Up Outlook
Enter your desired email address in the area marked 'Email address'
Step 3 - Setting Up Outlook
You will now be asked to enter your Office 365 password.
You will know if your in the correct place as a company logo may appear as our Nitec logo has below
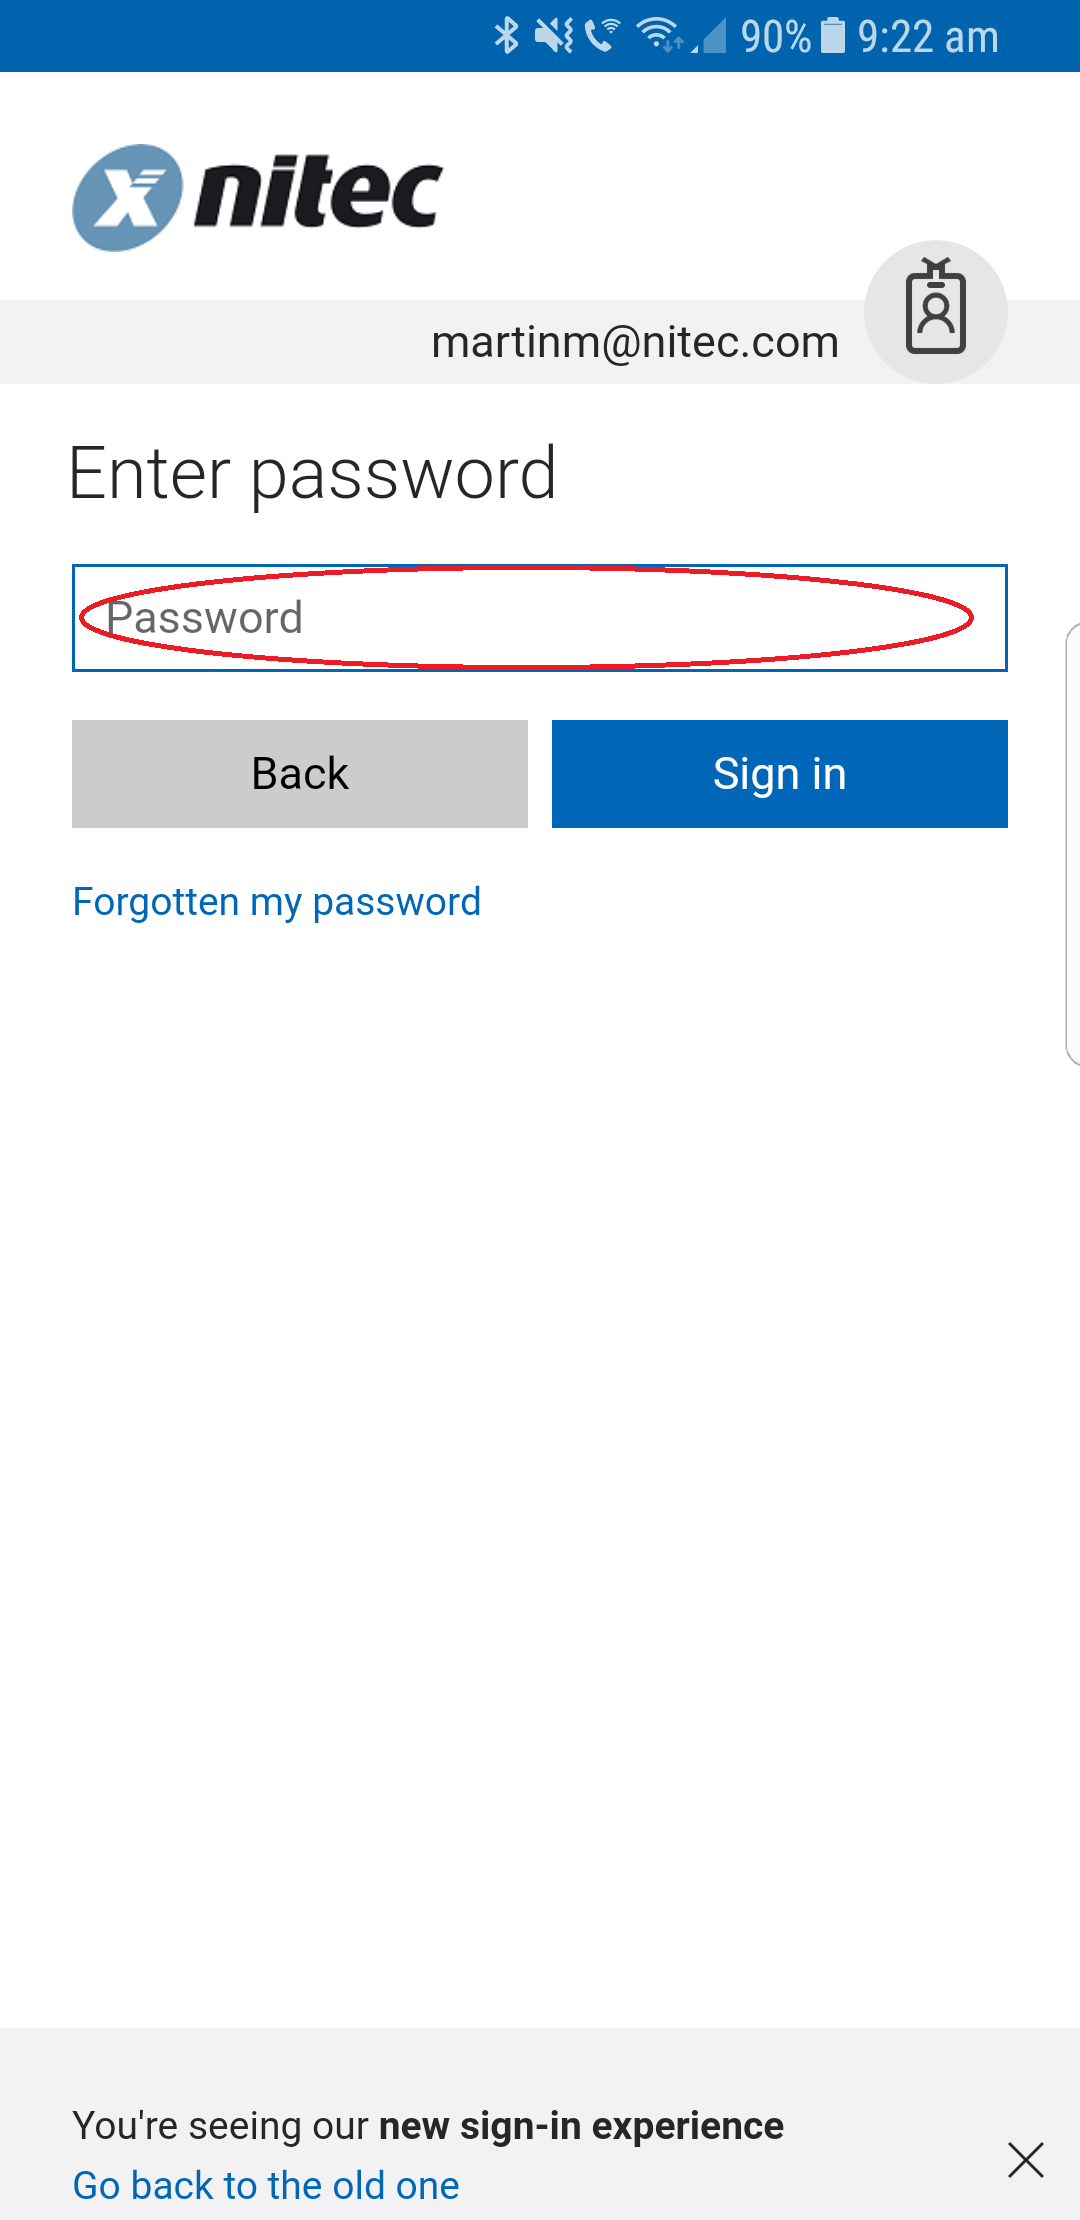
Note: As you are using the Outlook App, you can use your normal Office 365 password
No annoying 'App Passwords' required around here
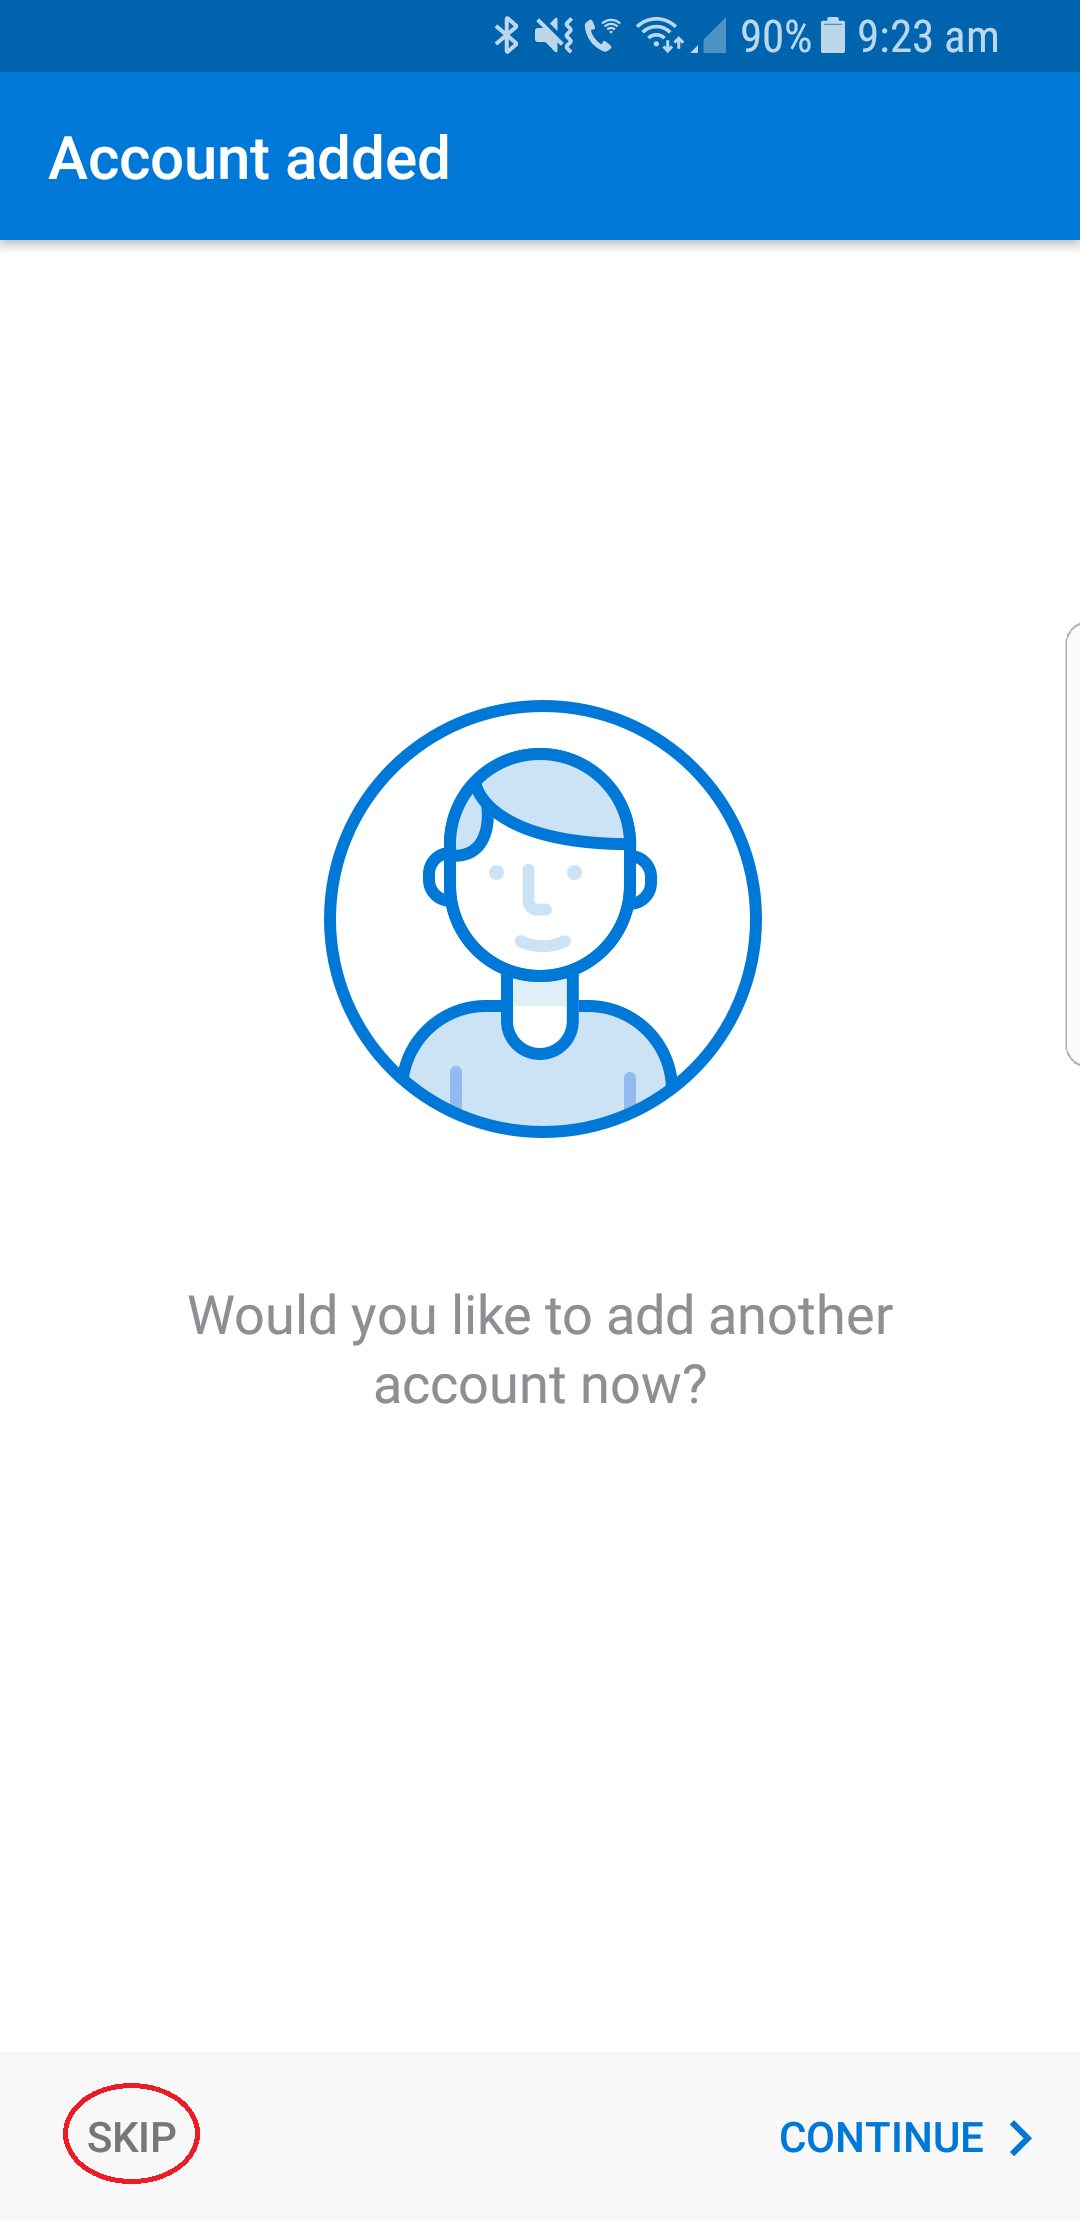
Step 4 - Setting Up Outlook
You can add as many email accounts as you like here - Such as your personal email account
Im just going to skip this and select Skip
Step 5 - Setting Up Outlook
Below is a split screen of what Outlook will now look like, on the right is your main mail screen and if you left the circled menu button the menu will appear as shown on the left side of the screen. This will allow you access to your different mail accounts and folders.
Android Outlook Mail Setup
If you are already using mobile email chose Existing. If this is your first time to use mobile email choose Set up new.
Step 1 - Remove Old Account (Pre 2-Factor Activation)
Now you have added 2-Factor Authentication to your account.
You now need to remove you old mail account and re add it to your phone
To begin tap the menu button
Step 3 - Remove Old Account (Pre 2-Factor Activation)
You'll see a list of you're active email accounts
Select the one you need to delete
Step 1 - Setting Up Outlook
The outlook app is the most secure method of accessing your files via your mobile phone. The outlook app has been designed especially for Office 365 and allows for Two Factor Authentication.
To begin tap 'Get Started'
Step 2 - Setting Up Outlook
Enter your desired email address in the area marked 'Email address'
Step 3 - Setting Up Outlook
You will now be asked to enter your Office 365 password.
You will know if your in the correct place as a company logo may appear as our Nitec logo has below
Note: As you are using the Outlook App, you can use your normal Office 365 password
No annoying 'App Passwords' required around here
Step 4 - Setting Up Outlook
You can add as many email accounts as you like here - Such as your personal email account
Im just going to skip this and select Skip
Step 5 - Setting Up Outlook
Below is a split screen of what Outlook will now look like, on the right is your main mail screen and if you left the circled menu button the menu will appear as shown on the left side of the screen. This will allow you access to your different mail accounts and folders.
iPhone Native Mail Setup
First of all you need to work out how to proceed. IOS 11 users do not need app passwords but IOS 10 do. You will also need to work out whether or not you already are using an email account on your device.
Need to check version. Goto Setting > General > About > Version
If the number starts with "11." then that is version 11 etc.
iPhone Native Mail Setup
If you are already using mobile email chose Existing. If this is your first time to use mobile email choose Set up new.
Update Password step 1
Since you chose existing you should see a company email account. In our case the company was Nitec. You should chose your own company email from the list you can see.
Update Password step 3
Enter the new horrible to type “App Password” into the password box.
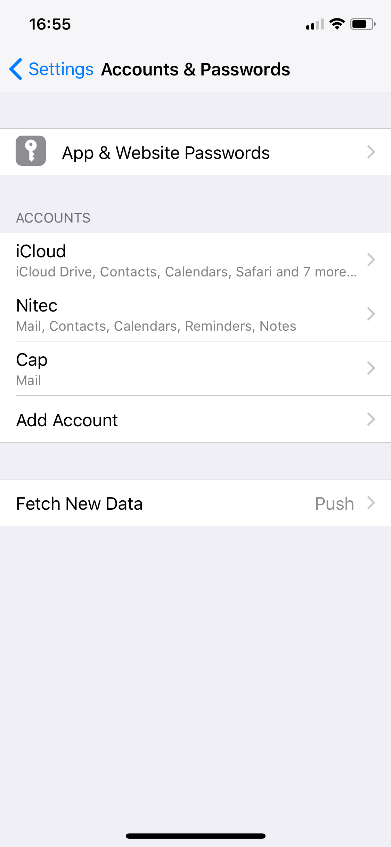
New Account step 1
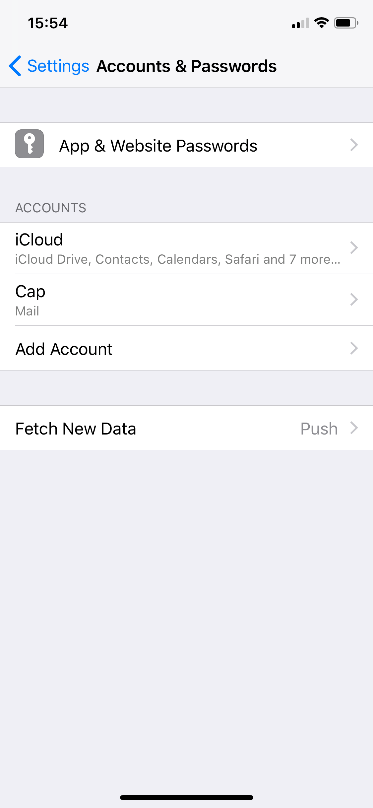
Ok, so you are dead set on using IOS Mail. Go to settings on your phone and scroll down to Accounts and Passwords. Once there press Add Account.
New Account step 2
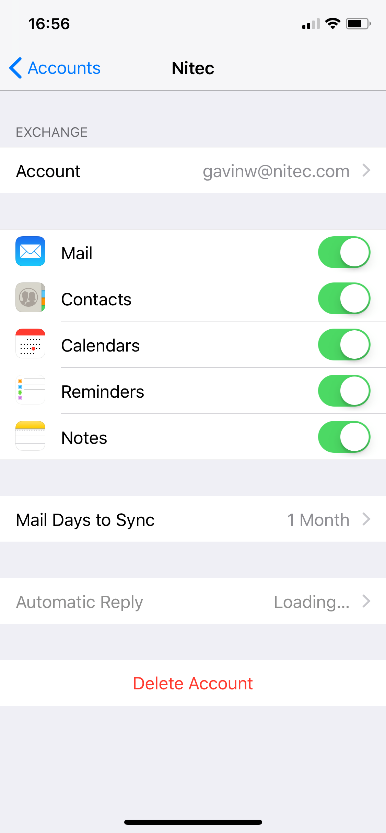
This will bring up a list of mail providers. For most of you the type you are looking for is Exchange. (This covers Office 365 as that’s what Office 365 is at the back end. Exchange Online).

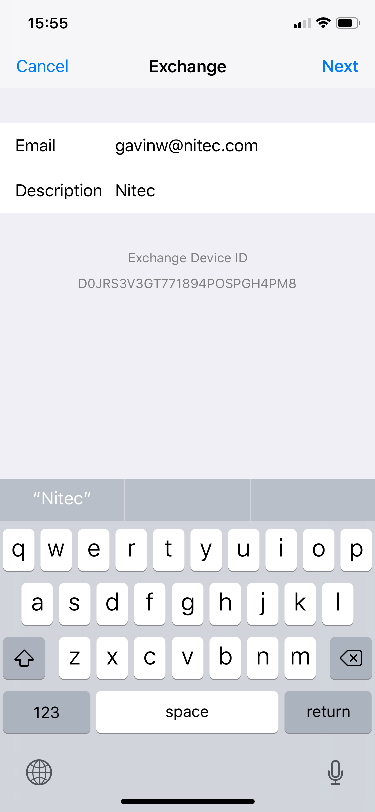
New Account step 3
Now put in your primary email address. Some of you have a few so if you have issues make sure the one you are using is your primary. Change the description from exchange to something that means something. I’ve changed mine to Nitec.
New Account step 4
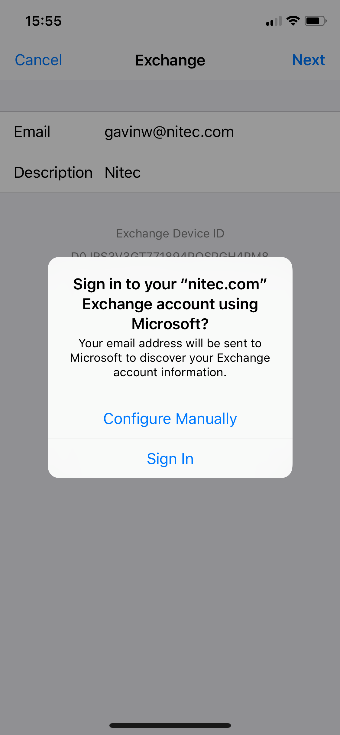
It will ask you to auto set up or manually configure. My experience lately when setting up with app passwords is manual is best.
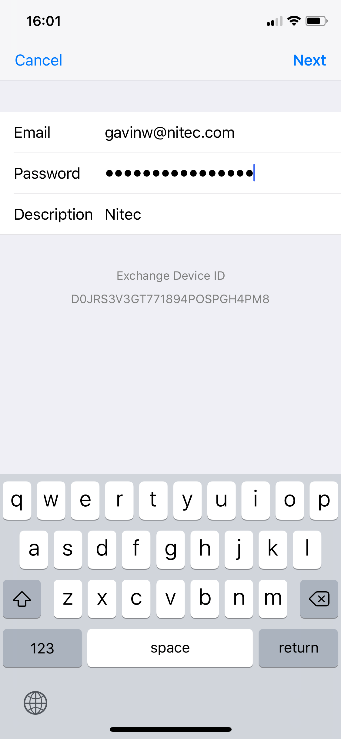
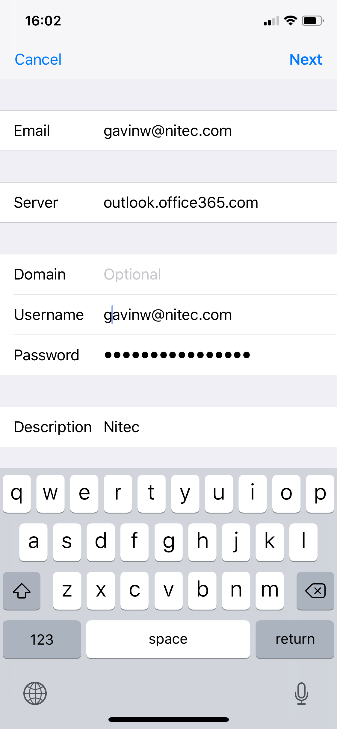
New Account step 6
6) Enter the two items you need.
For Office 365 you need to enter the server (Outlook.office365.com)
and your username. In my case, gavinw@nitec.com. You'd think it could work this out but it can't.
iPhone Native Mail Setup
If you are already using mobile email chose Existing. If this is your first time to use mobile email choose Set up new.
Update Password step 1
If you are already using mobile email chose Existing. If this is your first time to use mobile email choose Set up new.
Update Password step 3
Enter the new horrible to type “App Password” into the password box.
New Account step 1
Ok, so you are dead set on using IOS Mail. Go to settings on your phone and scroll down to Accounts and Passwords. Once there press Add Account.
New Account step 2
This will bring up a list of mail providers. For most of you the type you are looking for is Exchange. (This covers Office 365 as that’s what Office 365 is at the back end. Exchange Online).
New Account step 3
Now put in your primary email address. Some of you have a few so if you have issues make sure the one you are using is your primary. Change the description from exchange to something that means something. I’ve changed mine to Nitec.
New Account step 4
It will ask you to auto set up or manually configure. My experience lately when setting up with app passwords is manual is best.
New Account step 6
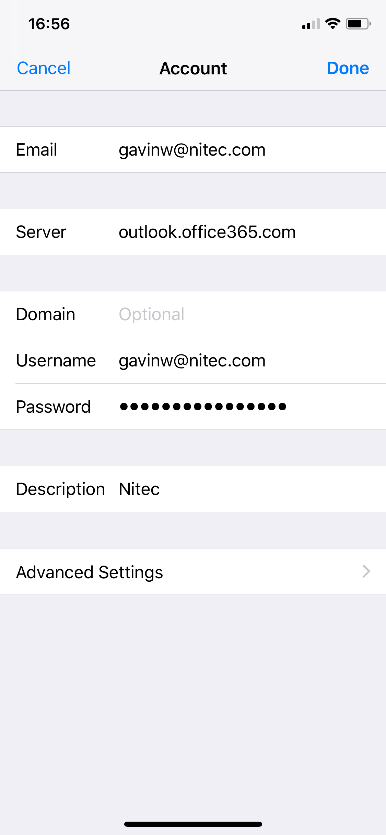
6) Enter the two items you need.
For Office 365 you need to enter the server (Outlook.office365.com)
and your username. In my case, gavinw@nitec.com. You'd think it could work this out but it can't.
App Password Location
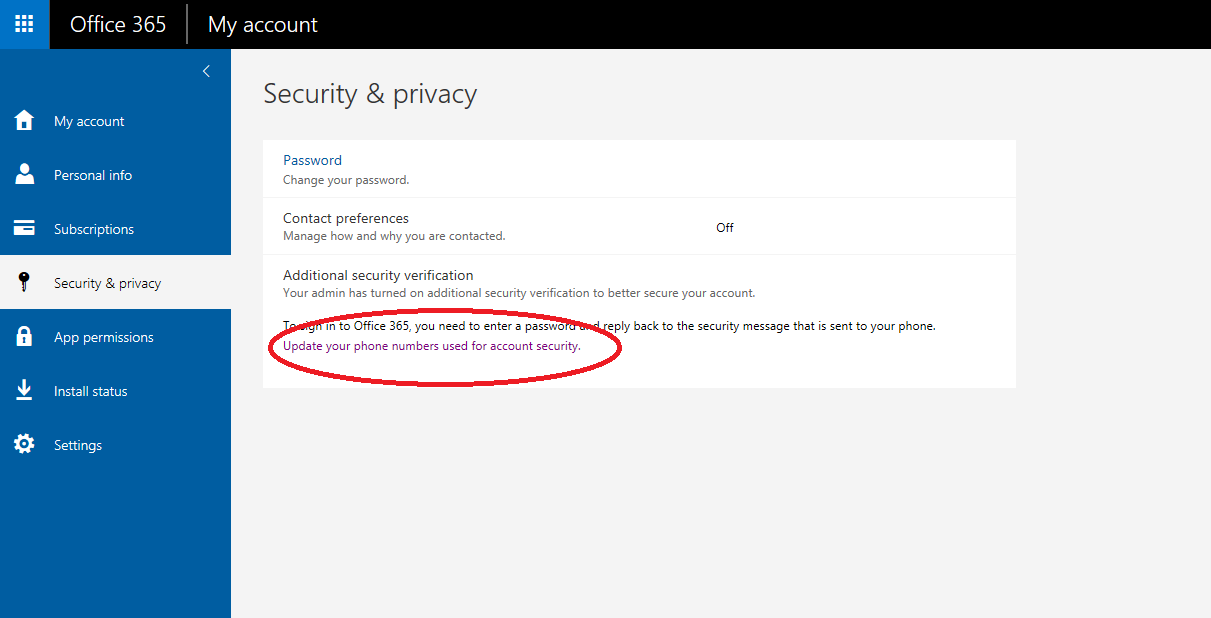
On your computer open the link - https://portal.office.com/account/#security
Choose 'Update your phone numbers used for account security'
App Password Location
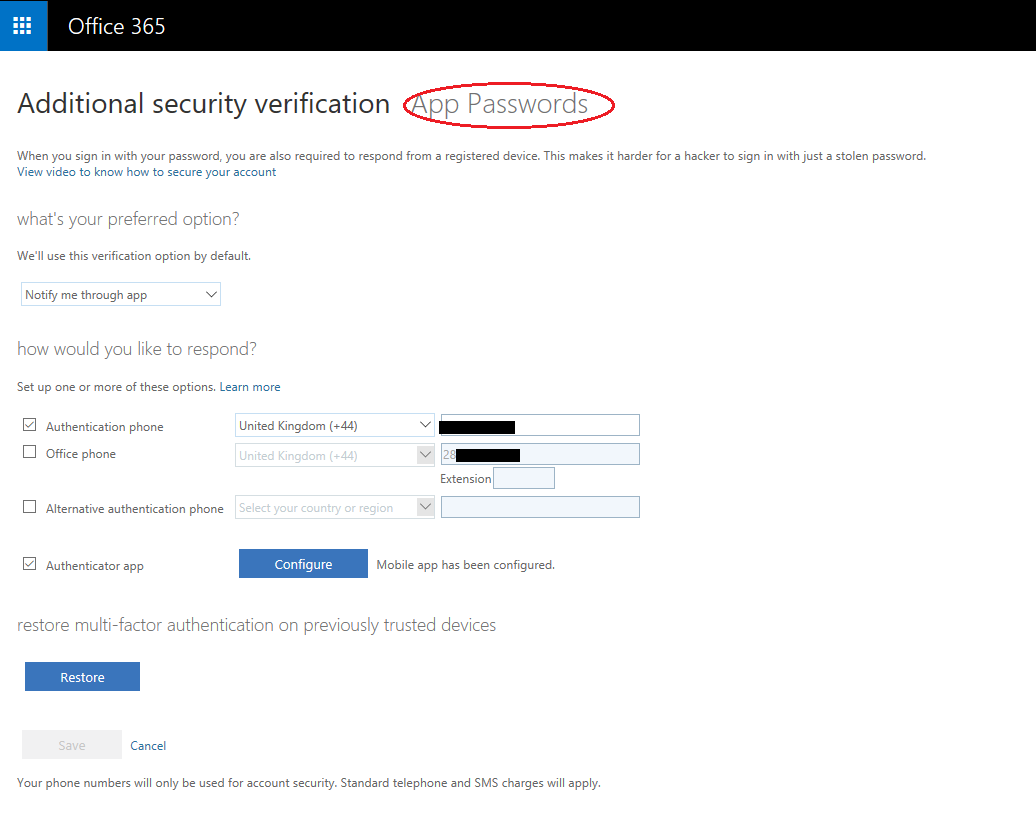
You should see a screen similar to the one below, detailing your telephone numbers and the Authenticator App which you have already setup
Select 'App Passwords'
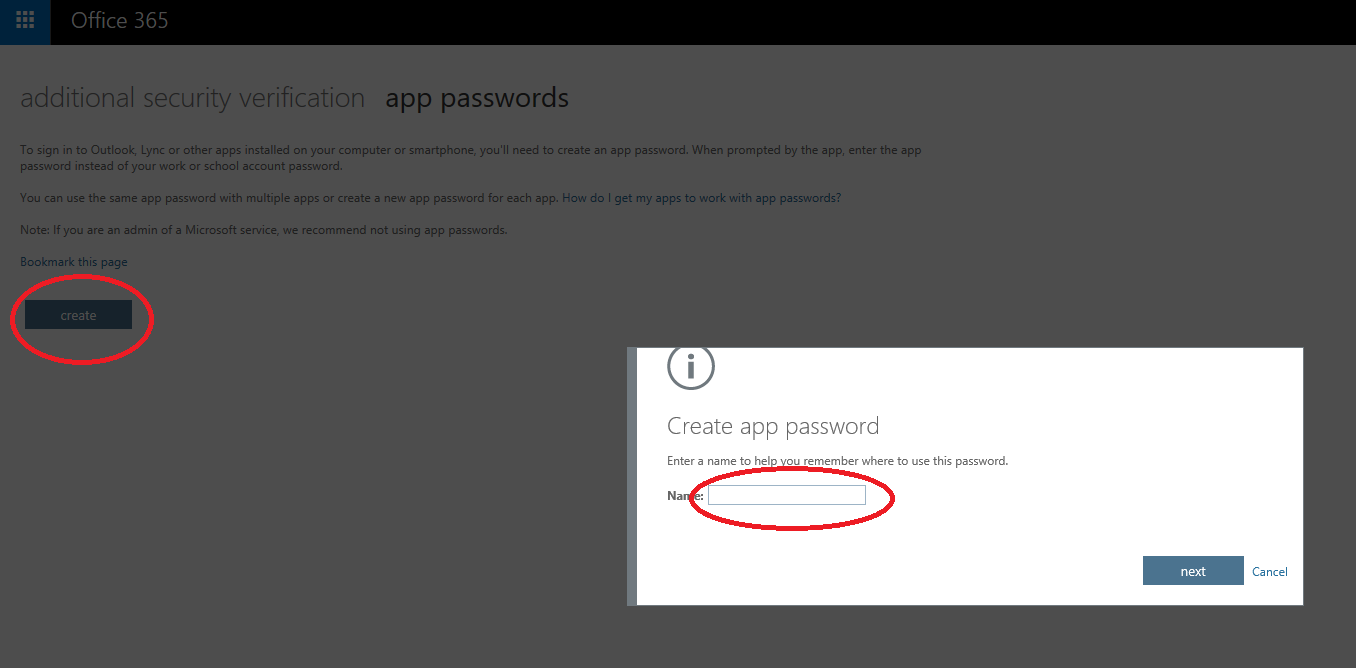
App Password Location
Select the 'Create'button on the left of the screen and you will see the popup as shown
Choose a name for your App Password - We suggest entering the name of the app your going to use this password in
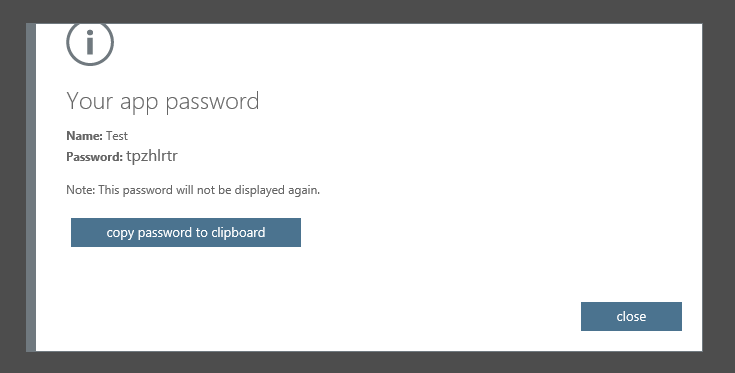
App Password Location
You will see your new Secure App Password which you can now enter into your phone
Please do not write this down and only use it in this one app
If you get a new phone come back to this page and delete your old App Password and create a new one, this is the most secure way of keeping you safe
Android Native Mail Setup
If you are already using mobile email chose Existing. If this is your first time to use mobile email choose Set up new.
Android Native Mail Setup - Remove
As you have now enabled Two Factor Security you need to remove your mail account from your phone and readd it.
Open the gmail App
Tap the menu button

Android Native Mail Setup - Remove
Select the small Upside down Arrow shown in the small circle below:
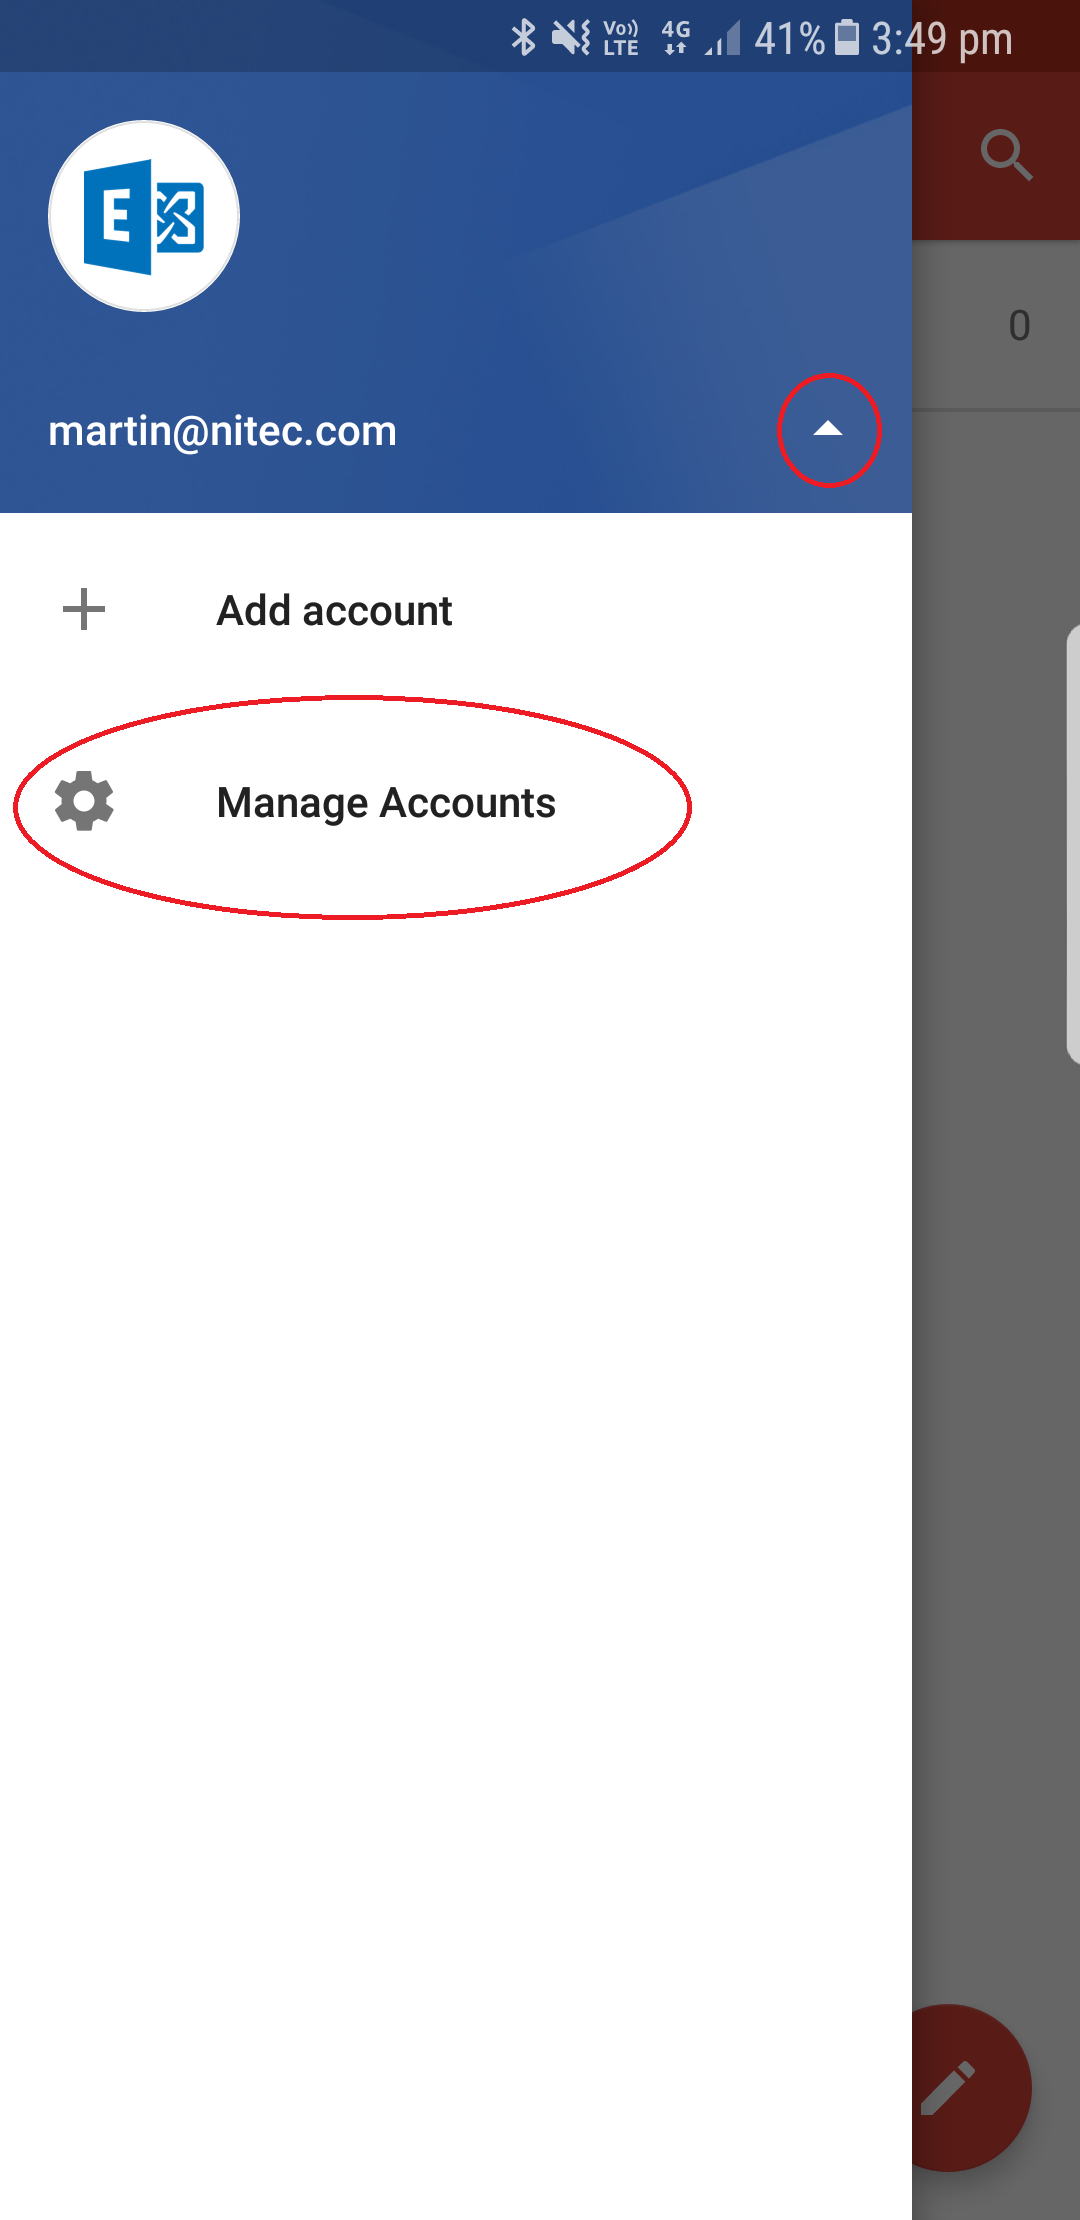
Then select 'Management Accounts'

Android Native Mail Setup - Remove
Tap the desired email account 'martinm@nitec.com'
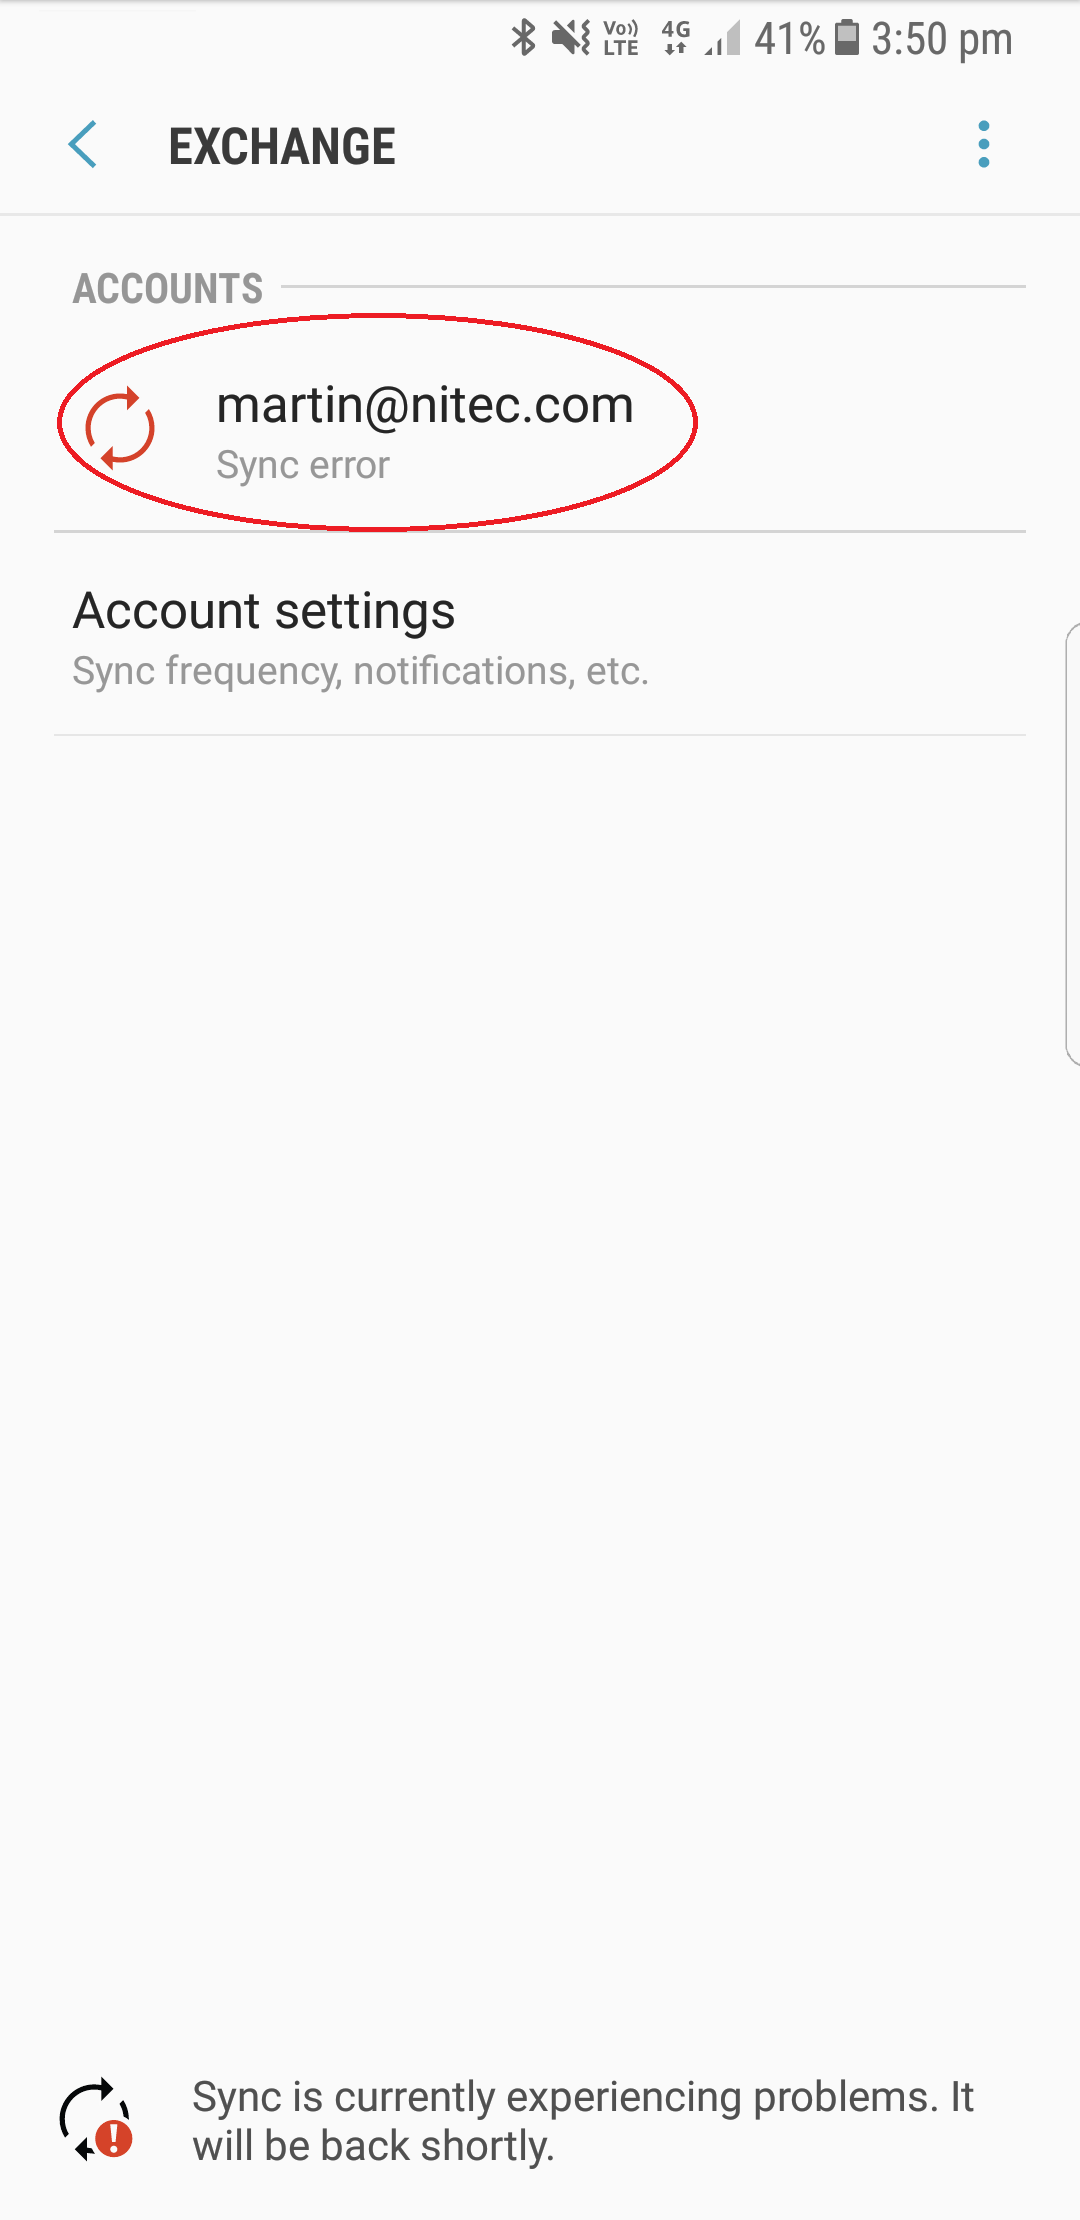
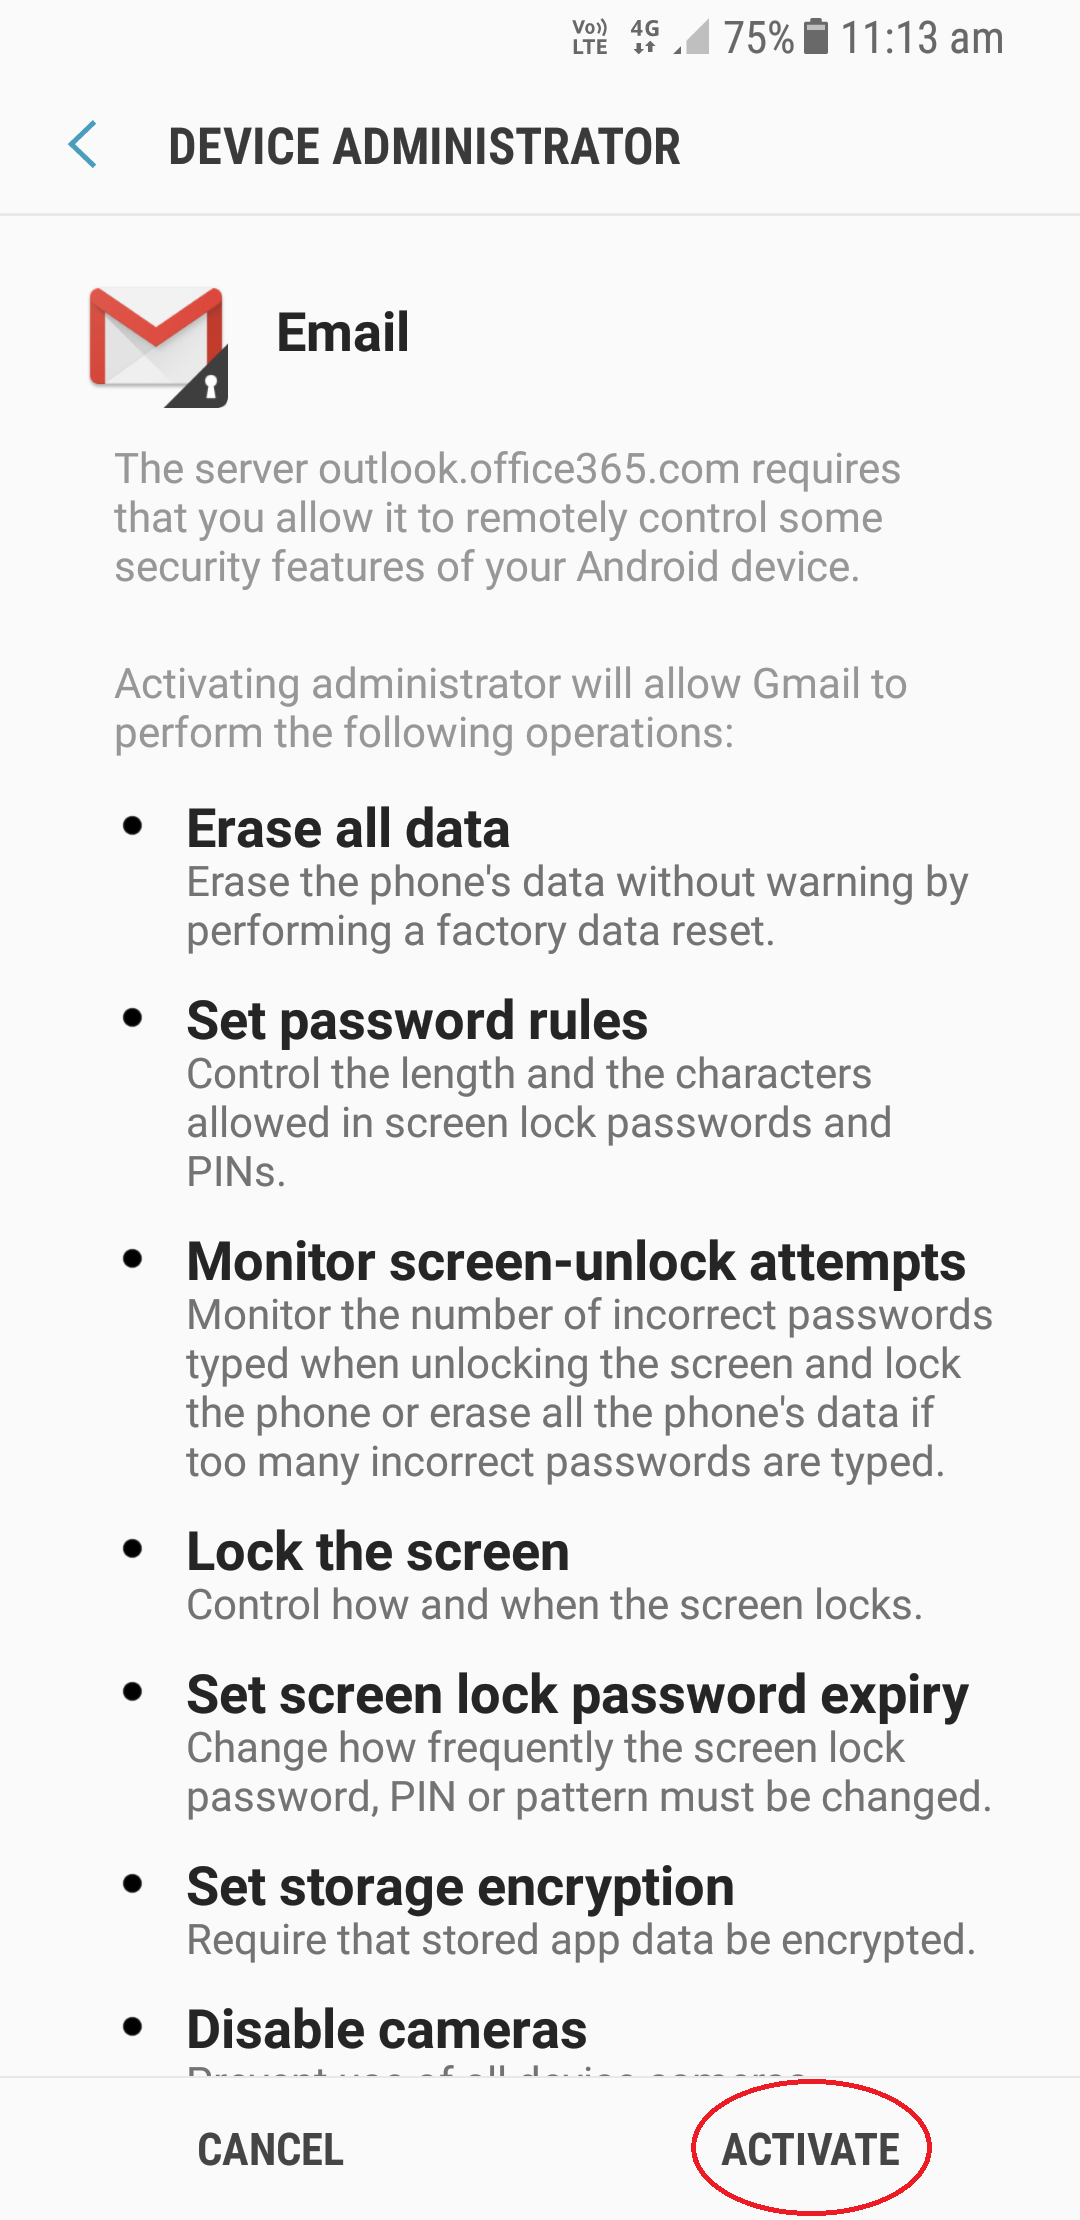
Note: You can see that I have an error message at the bottom of the screen stating 'Sync is currently experiencing...' This is because I have enabled Two Factor Authentication on my own account and I havent setup the email account yet with an App Password to bypass this.
Back NextAndroid Native Mail Setup - Remove
Tap the menu button
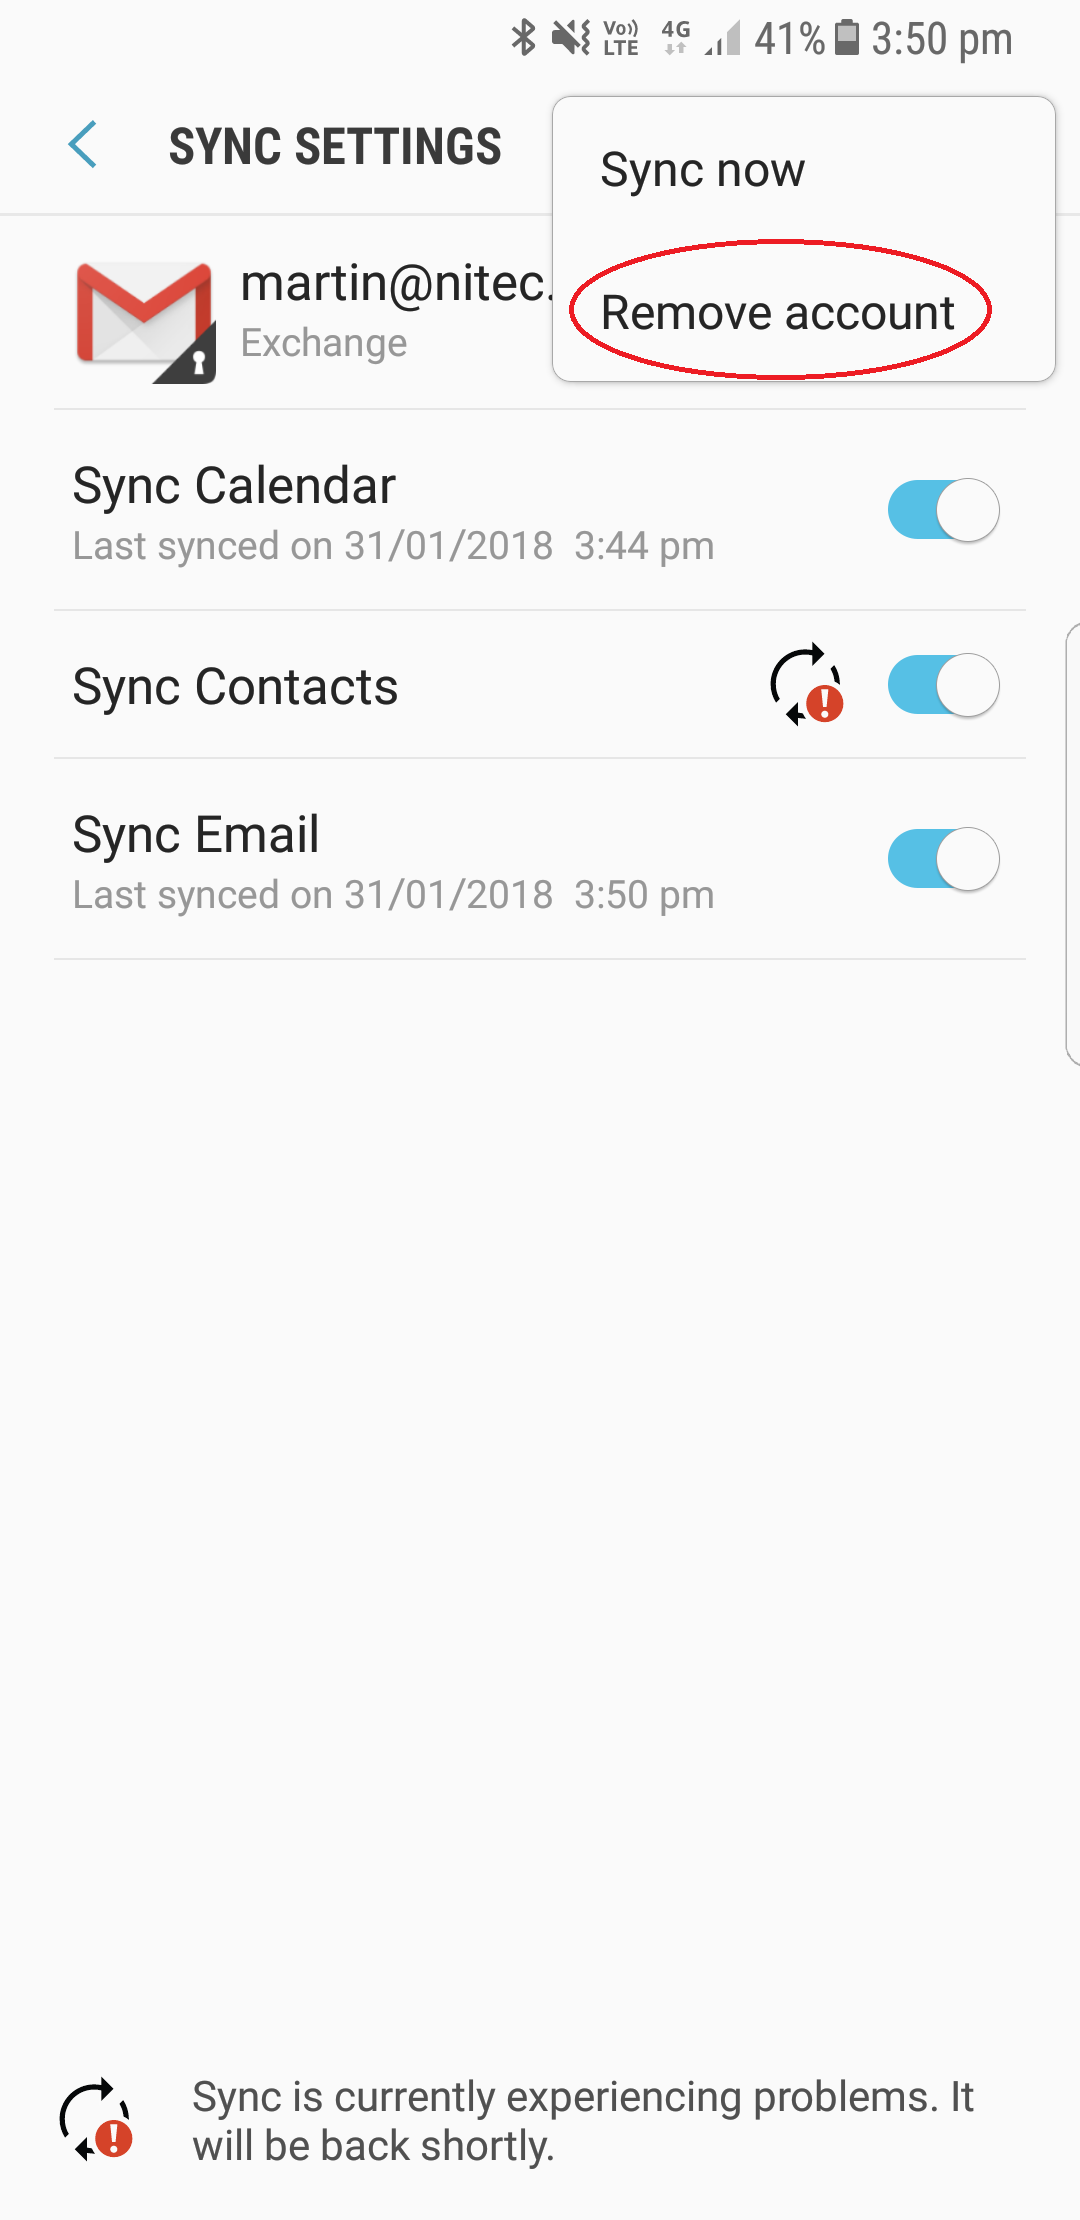
Select 'Remove Account'
Close gamil...Its now time to setup your email from the begining
Back NextNew Account step 1
Ok, so you are dead set on using Android's gmail app.
To get started open the gmail app, you will be presented with a screen such as somthing below
Select the button marked by a circle
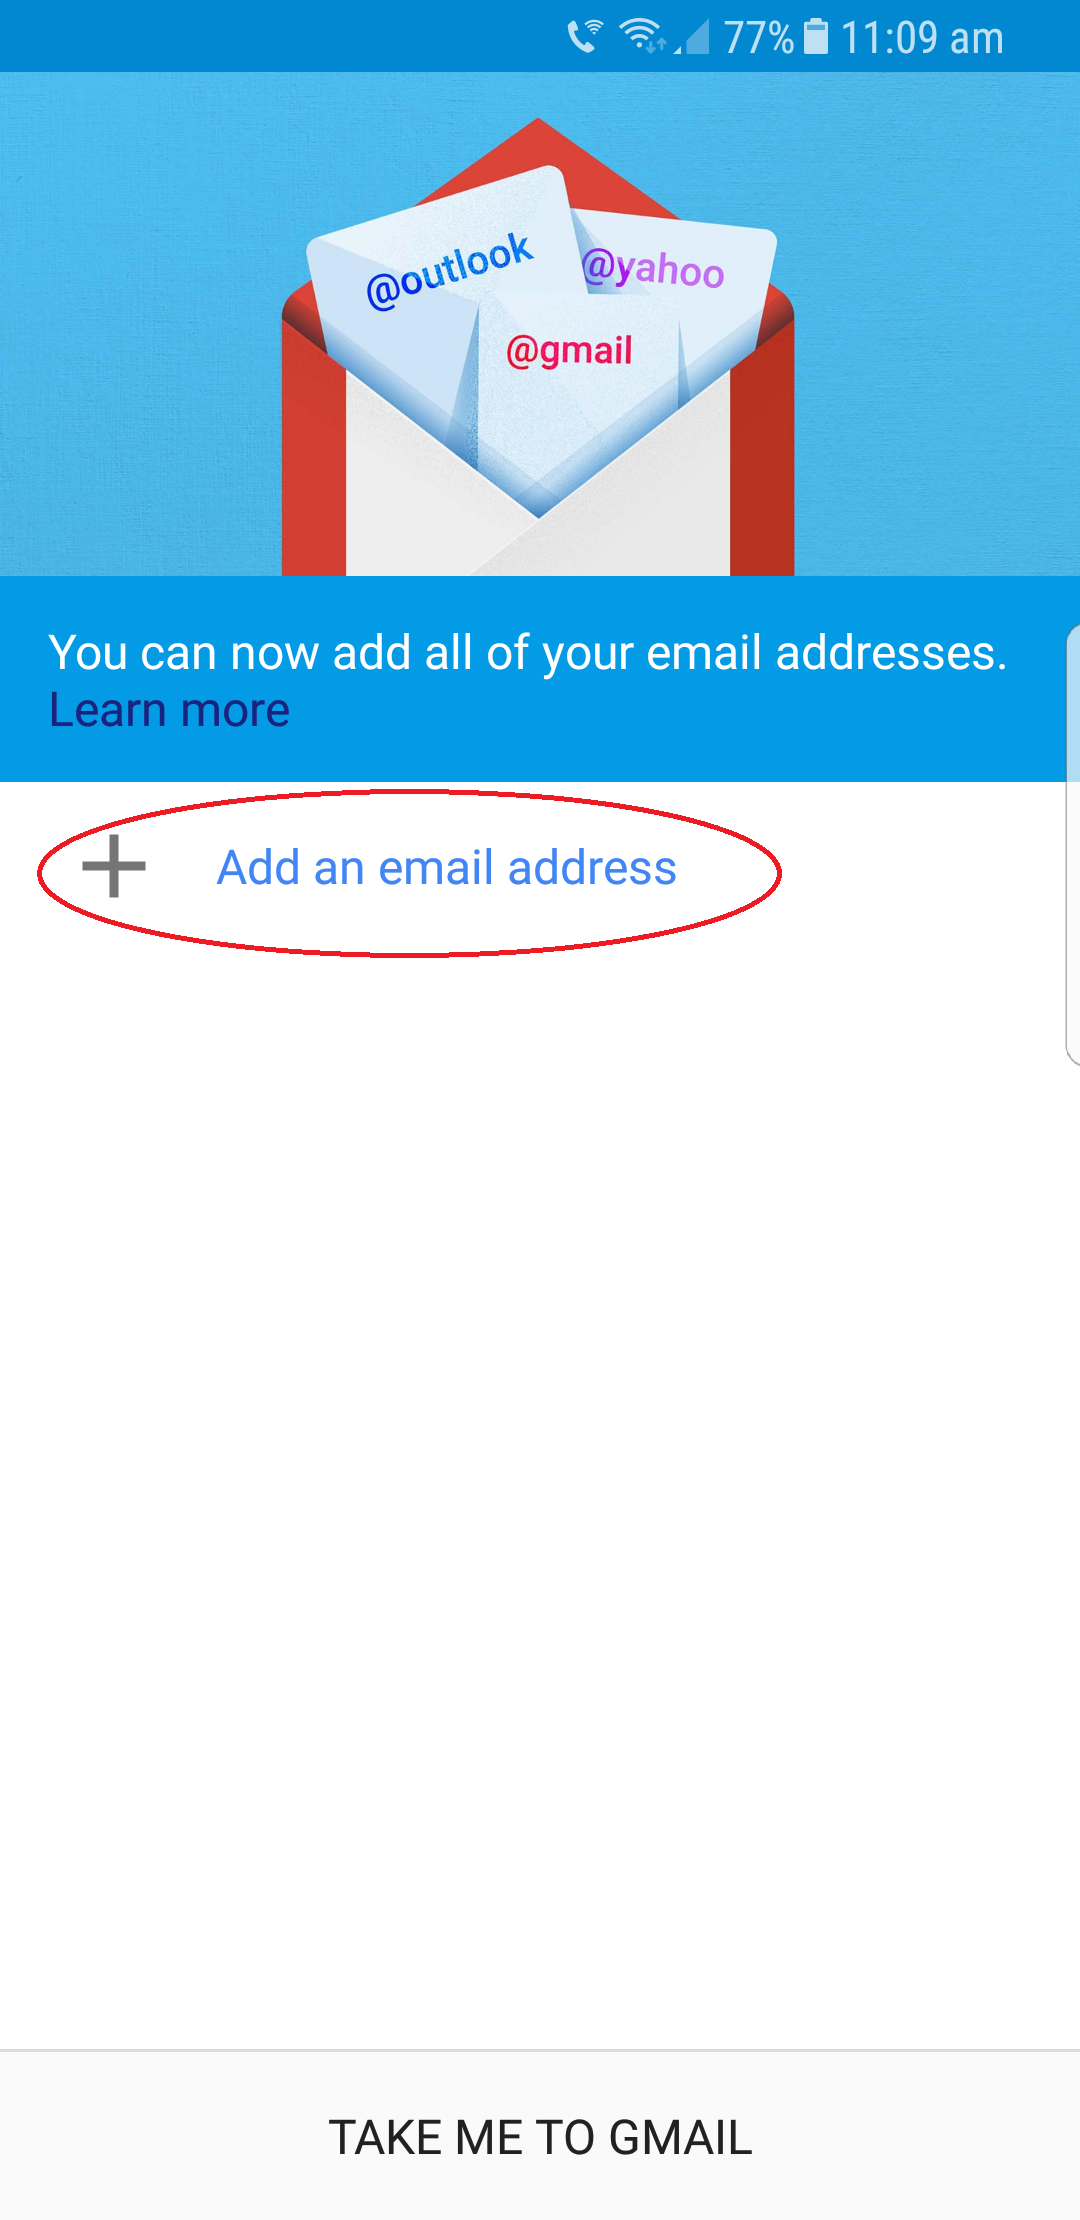
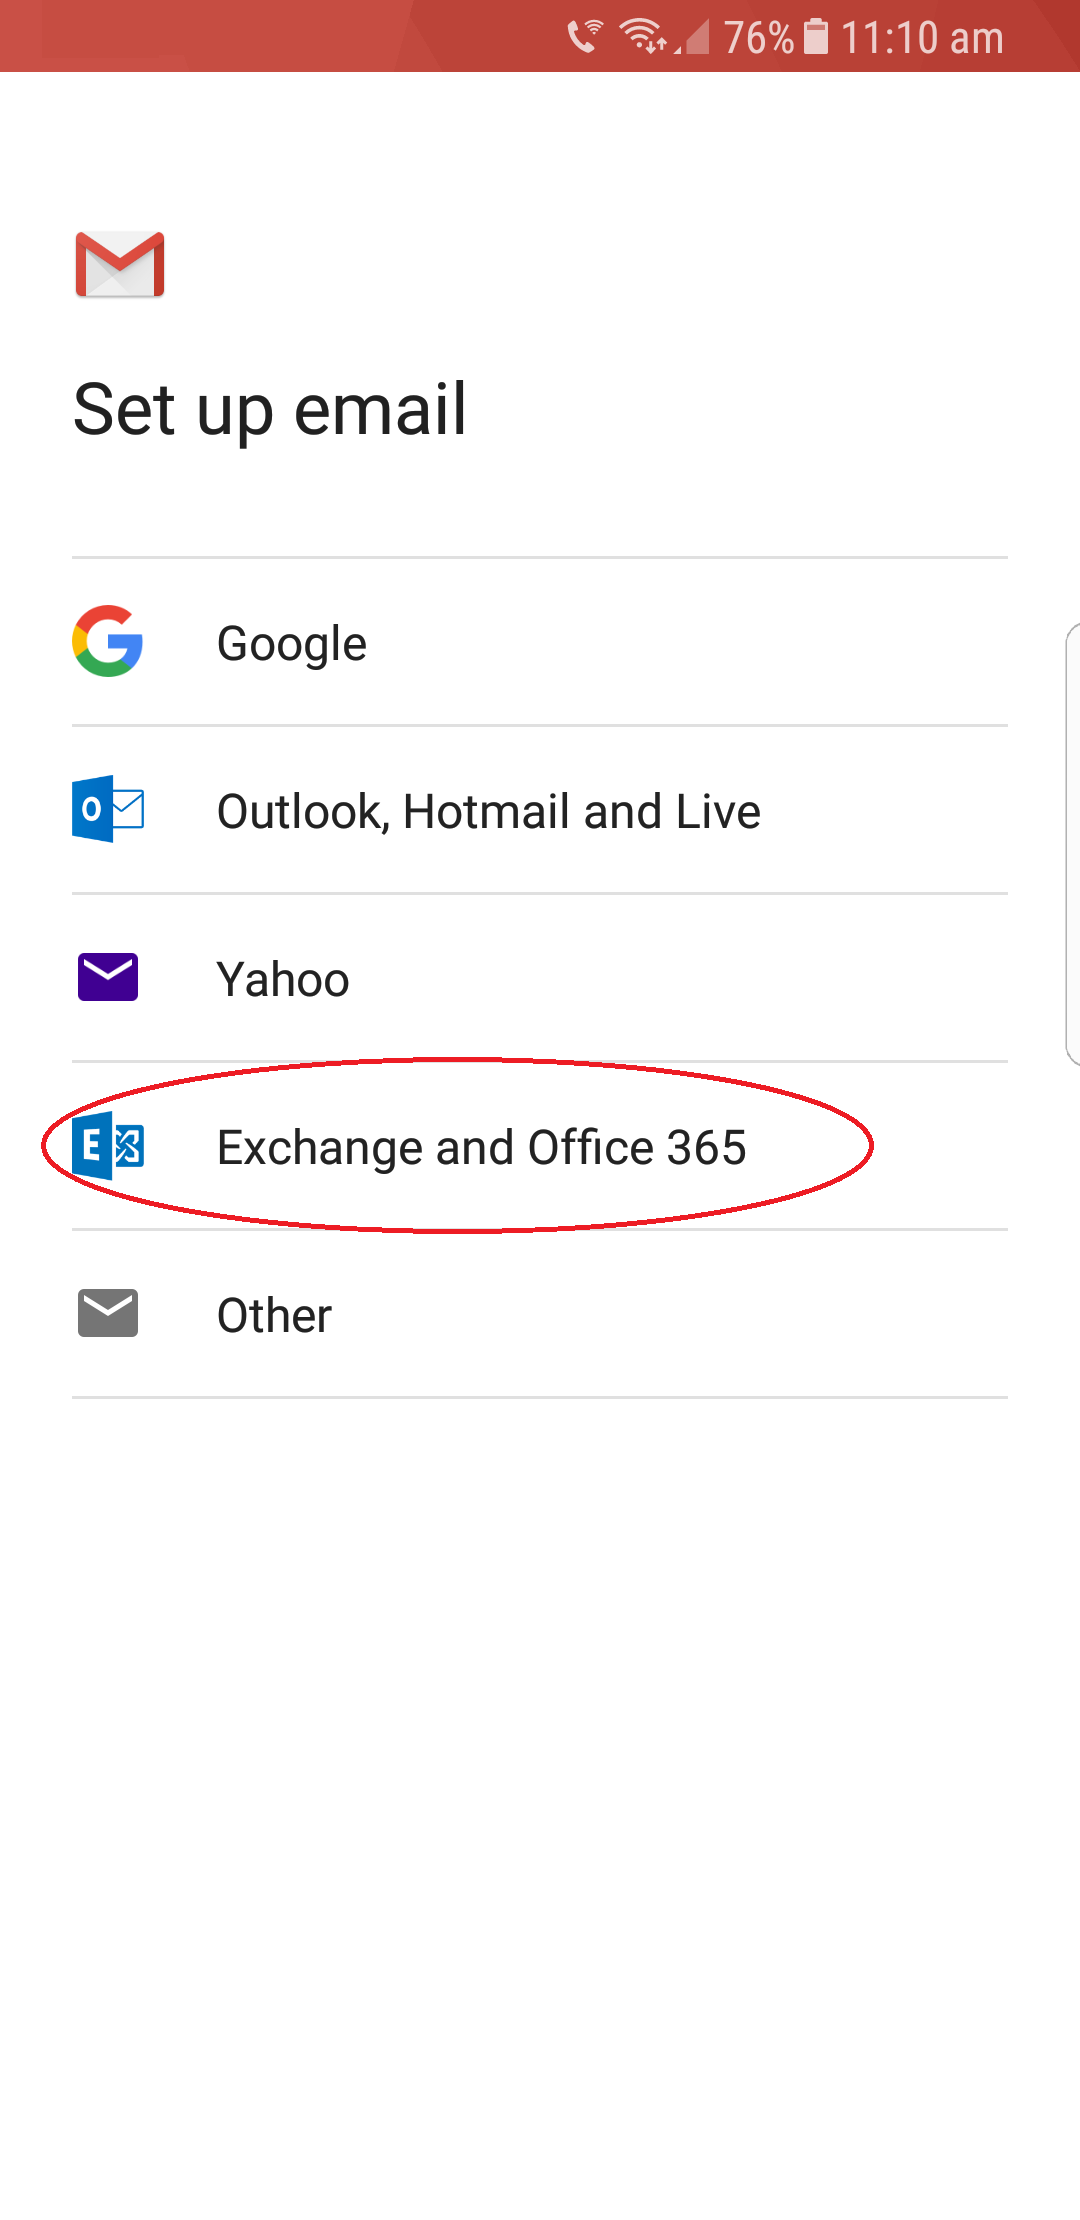
New Account step 2
You will see any listed email accounts listed on this screen.
Select 'Add an email address' - This will allow you to add your desired email account to your phone
New Account step 4
Enter your desired email address, as shown below where a Nitec email address has been entered
Choose 'Next'

New Account step 5
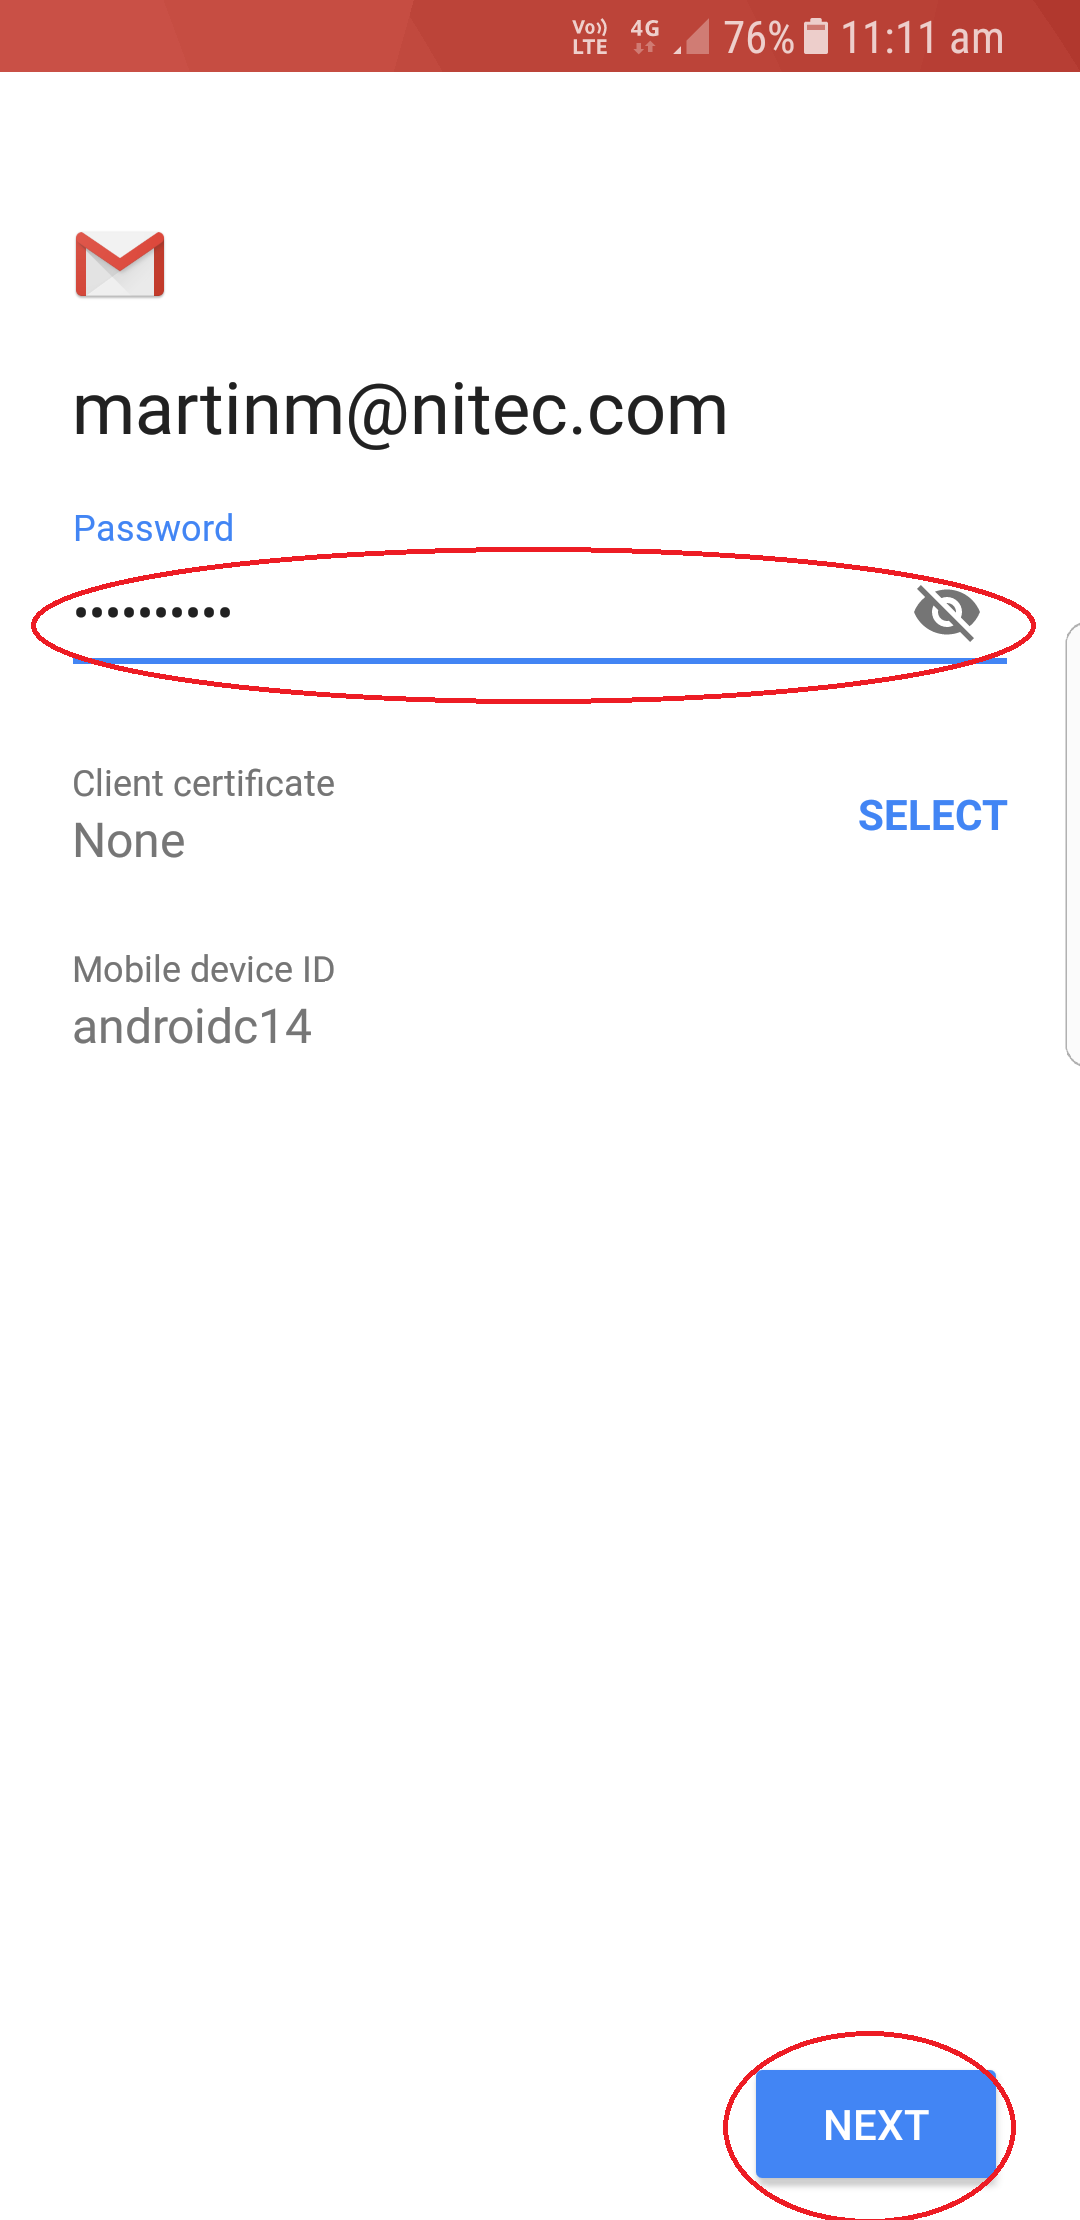
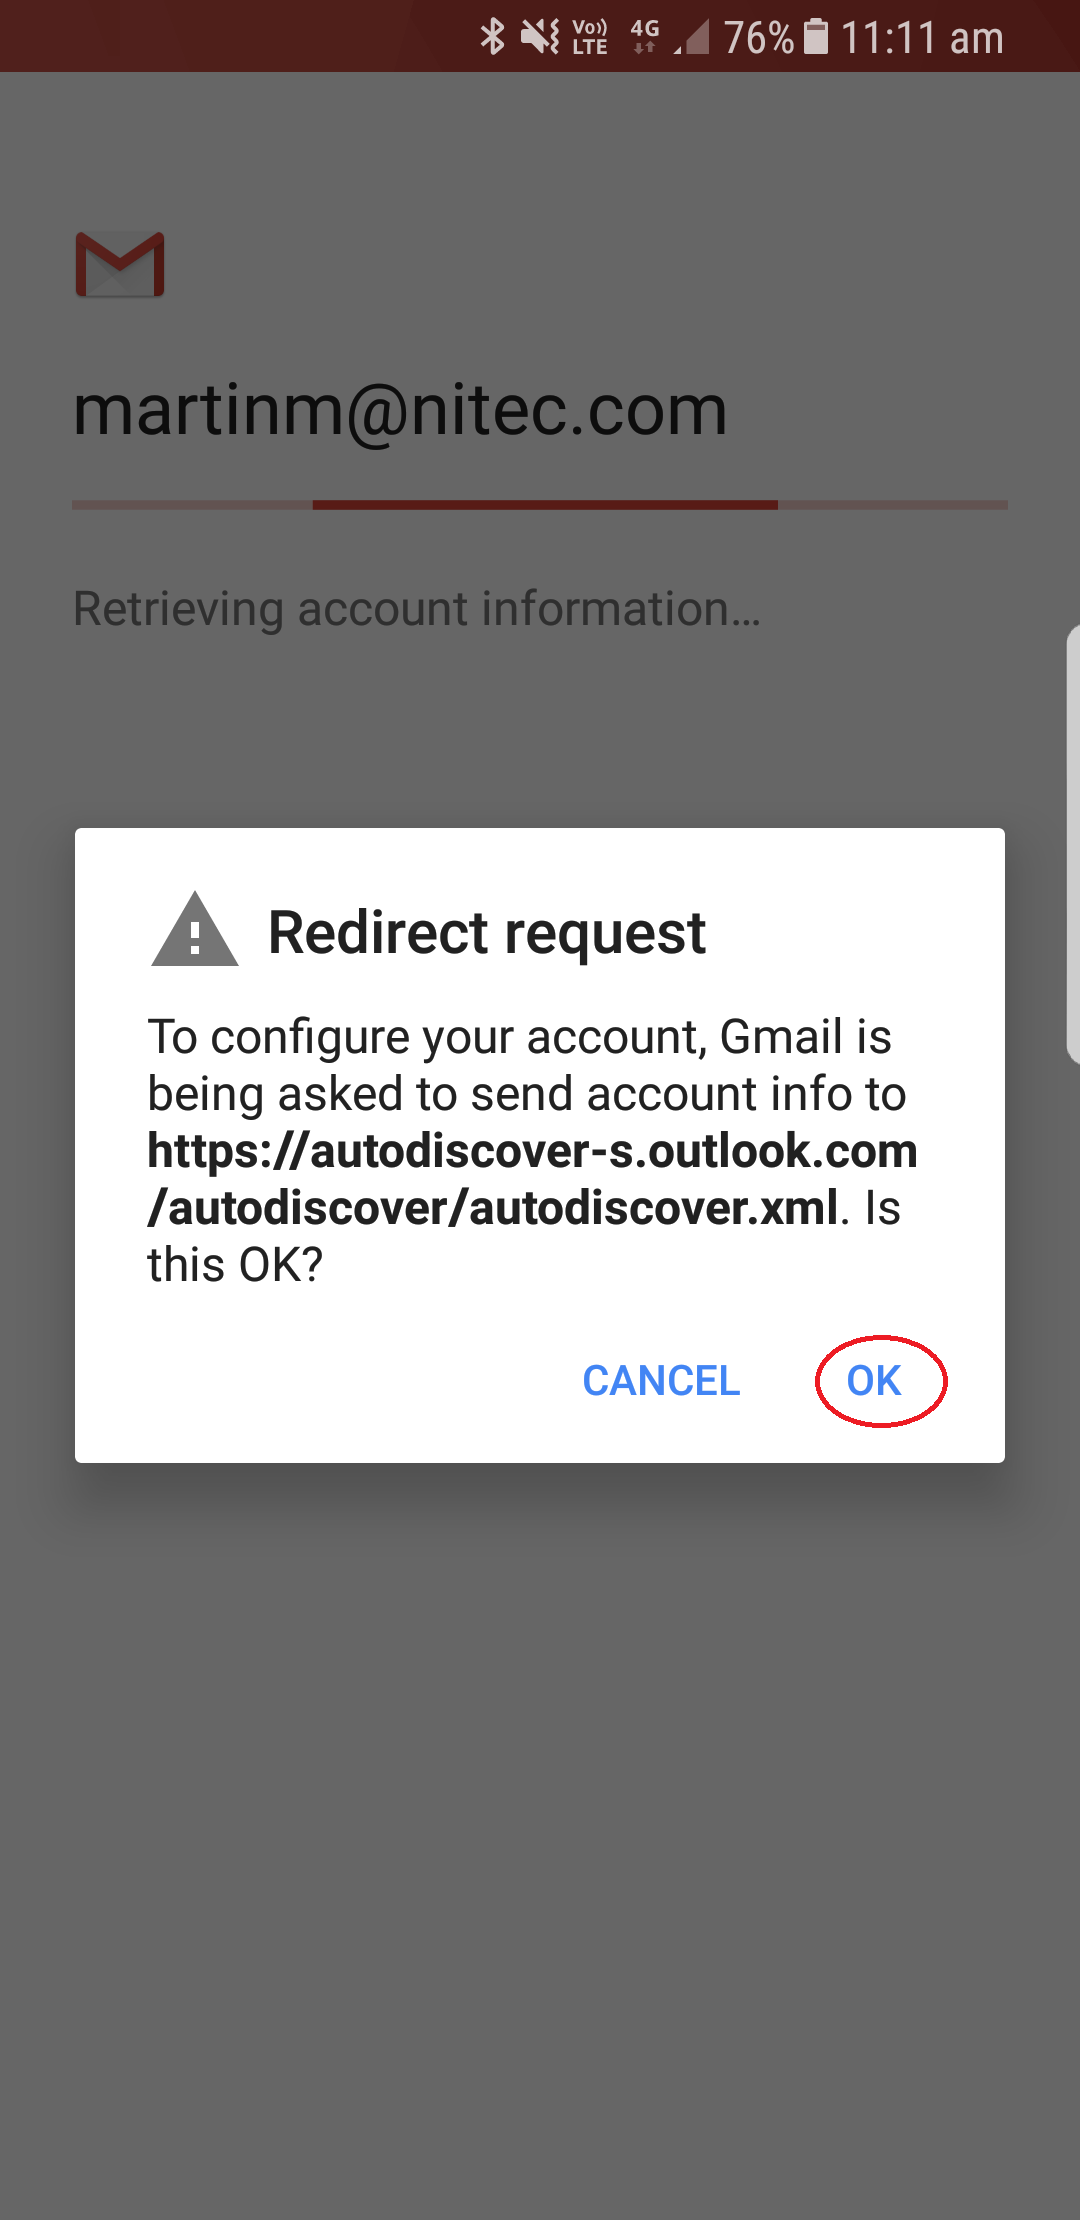
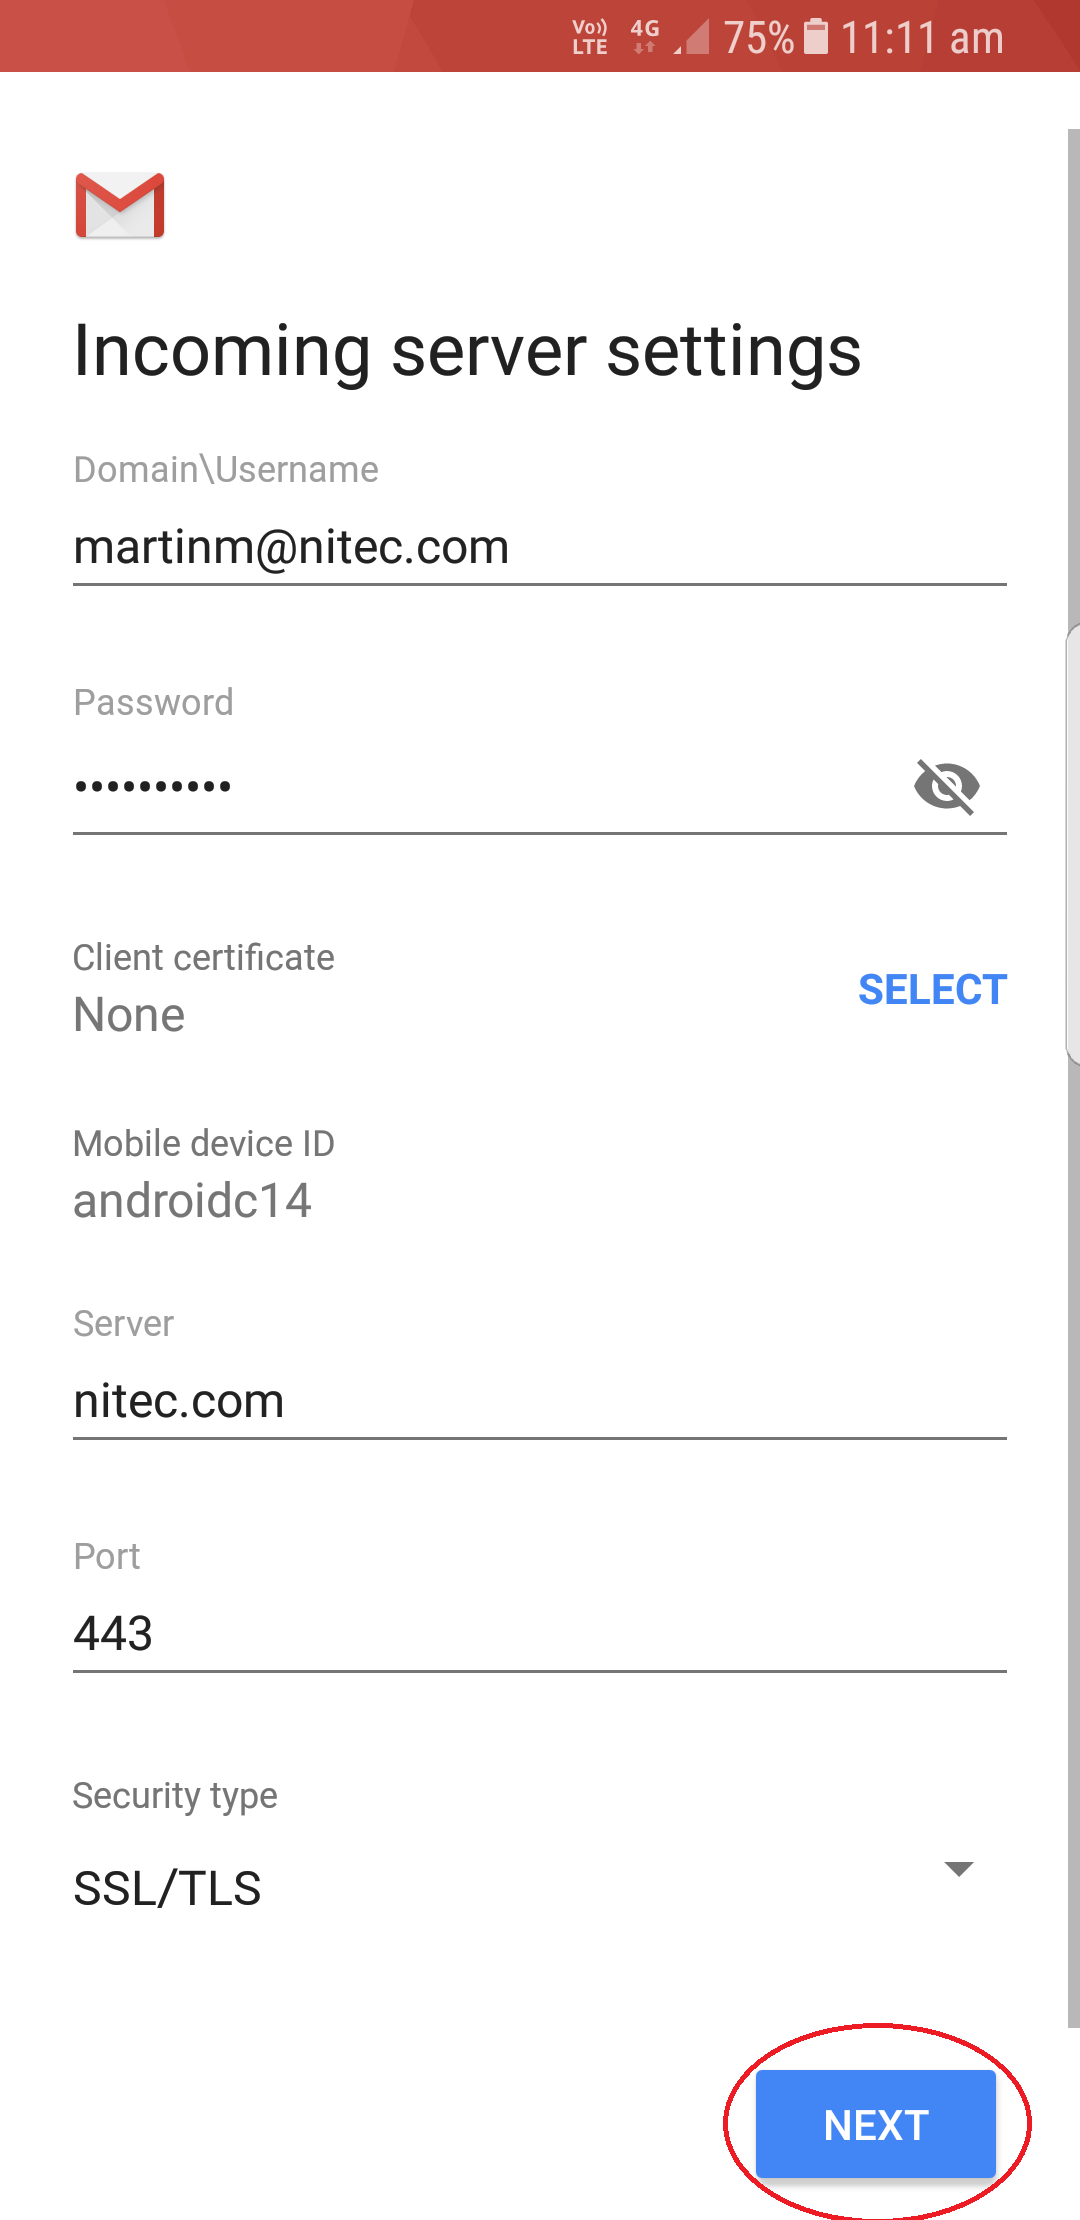
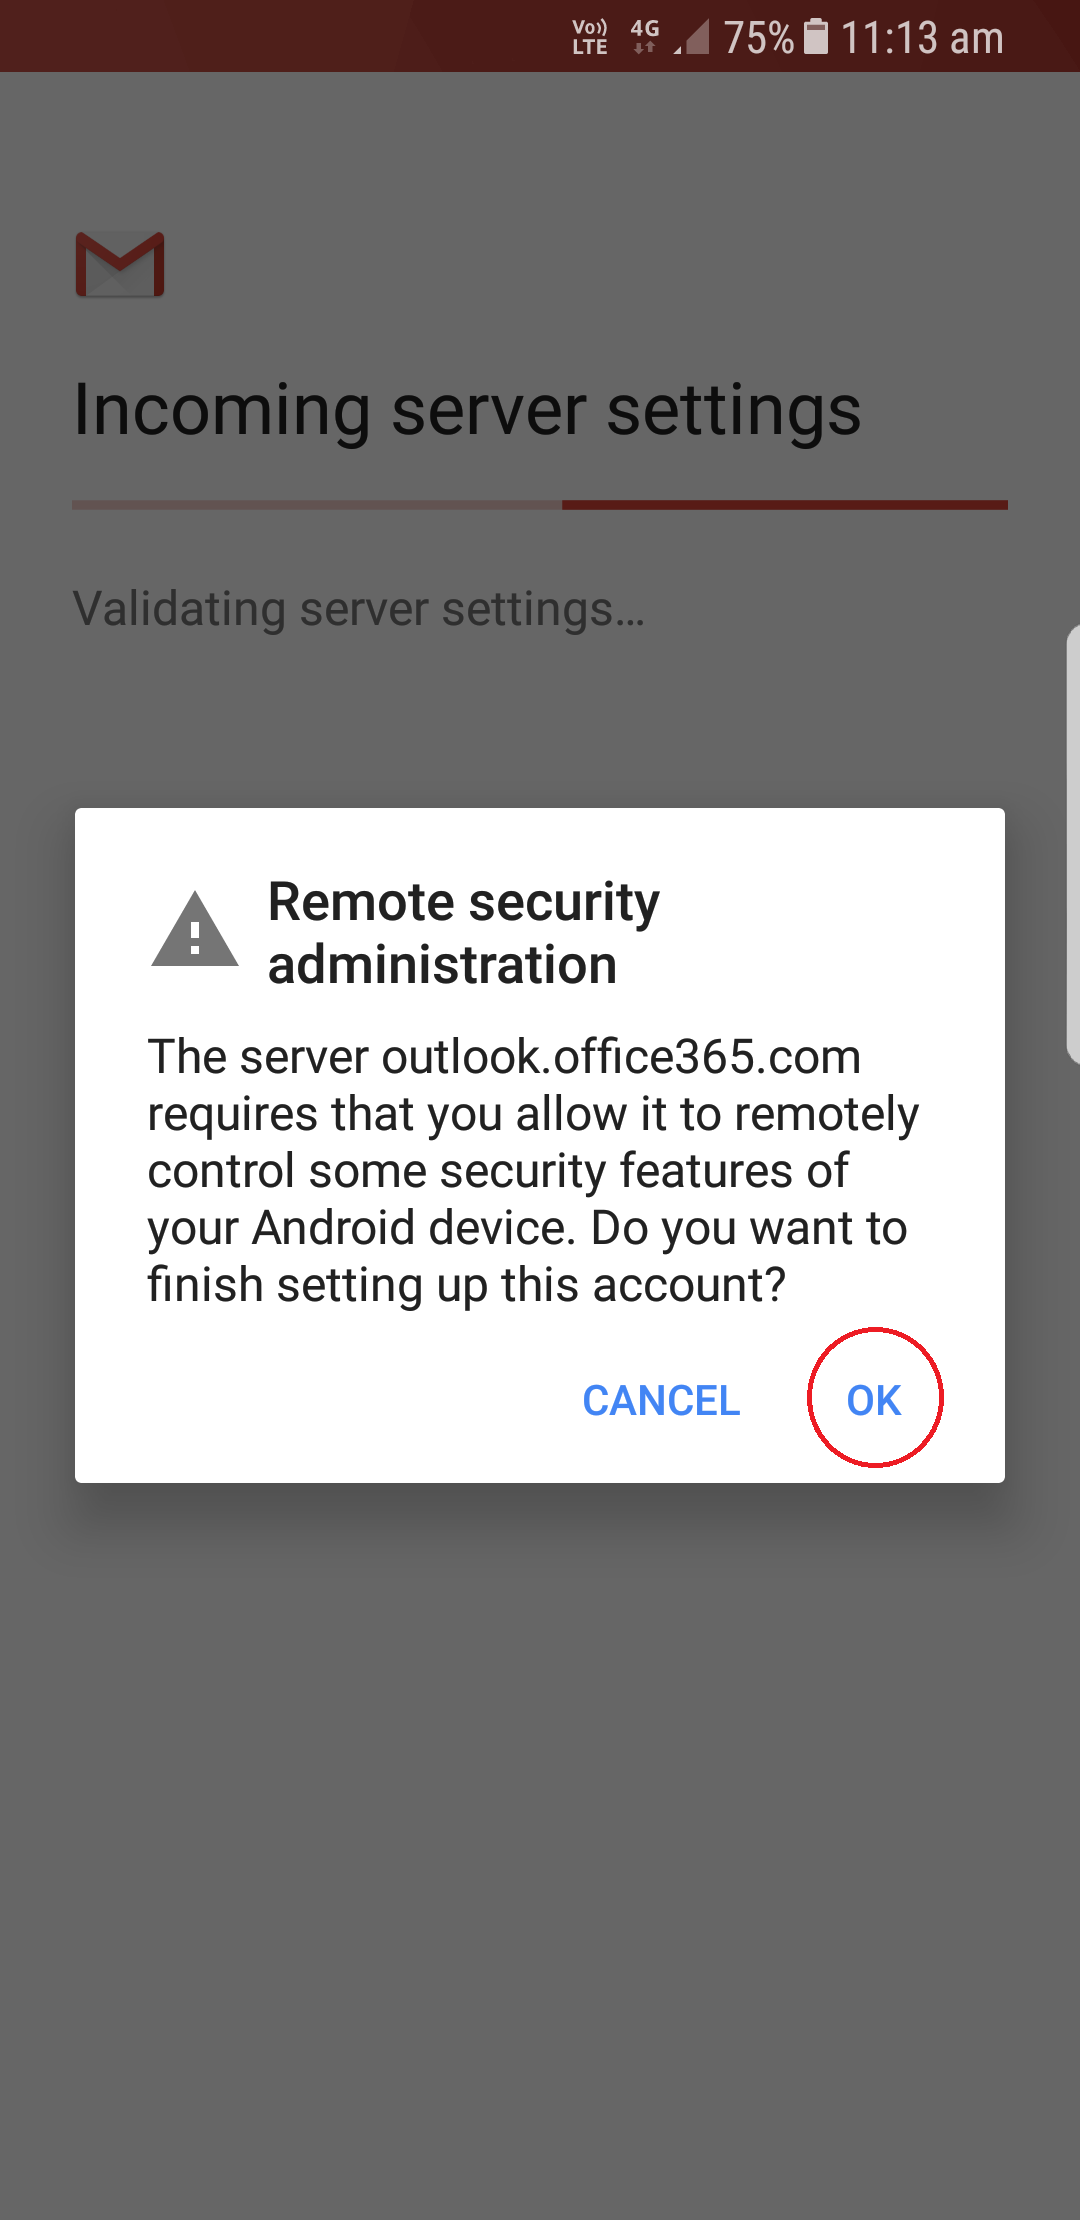
You now need to enter your App Password - This is different from your normal Office 365 password
Select the 'Find App Password' button to locate this
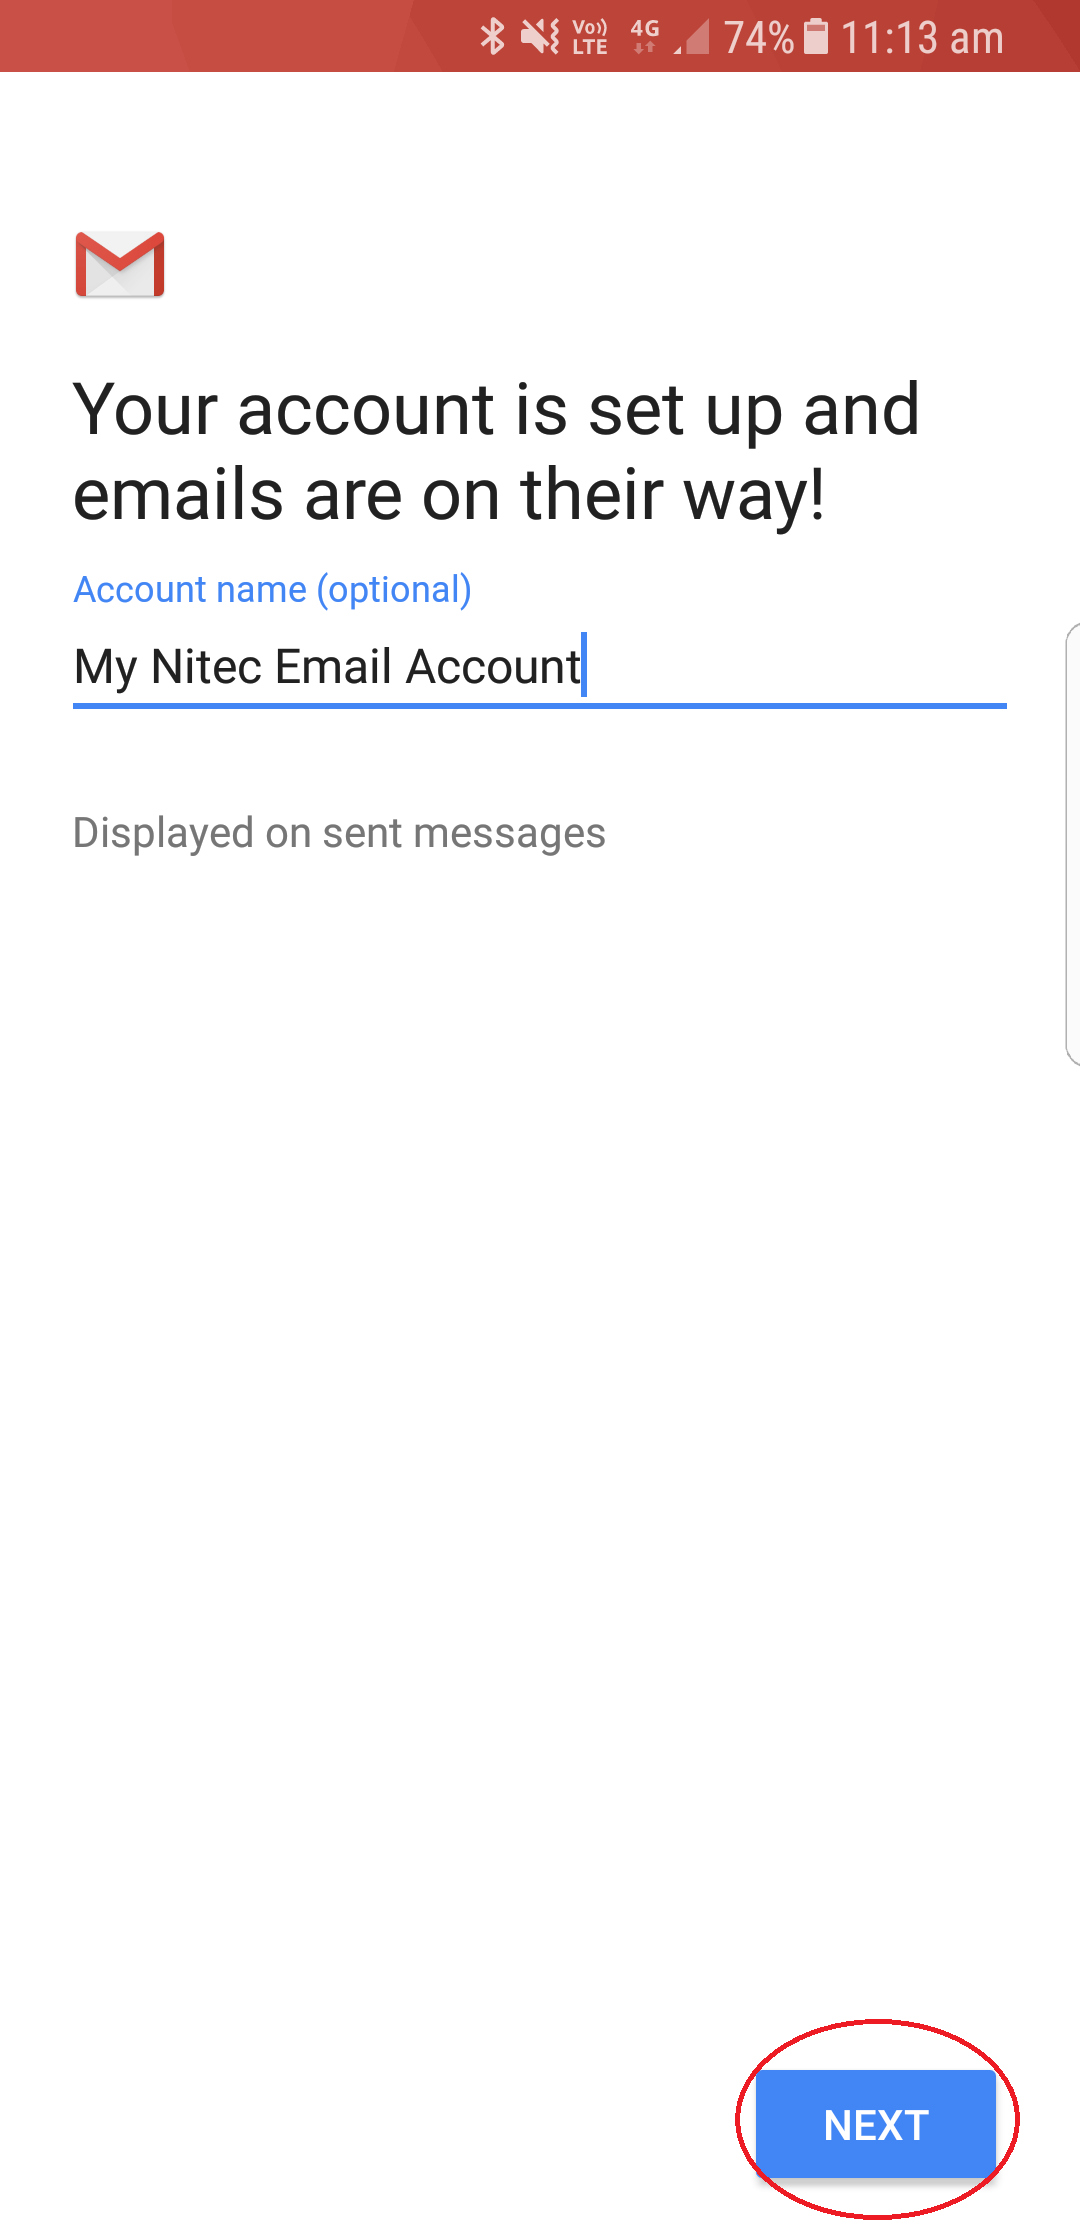
New Account step 10
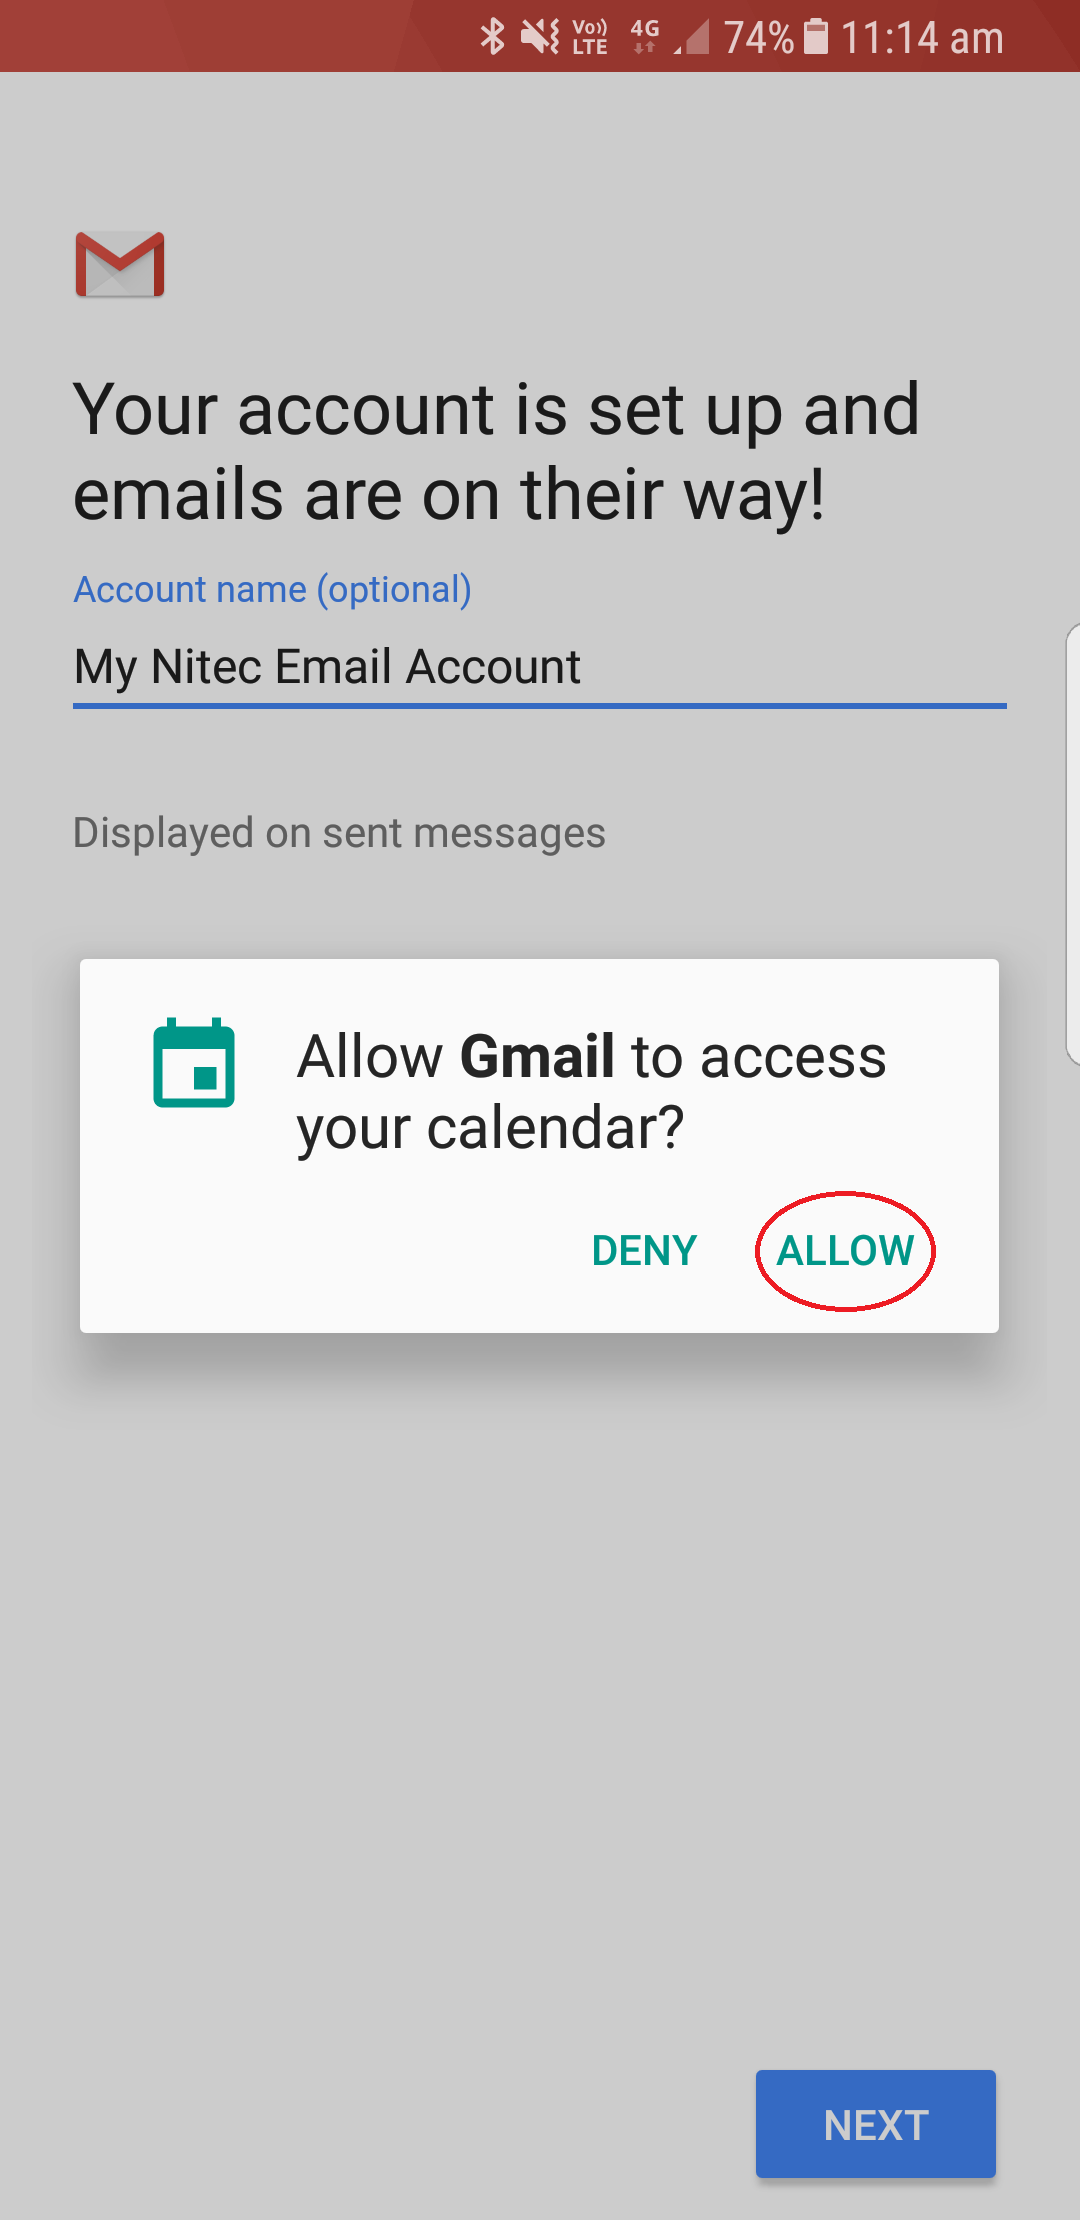
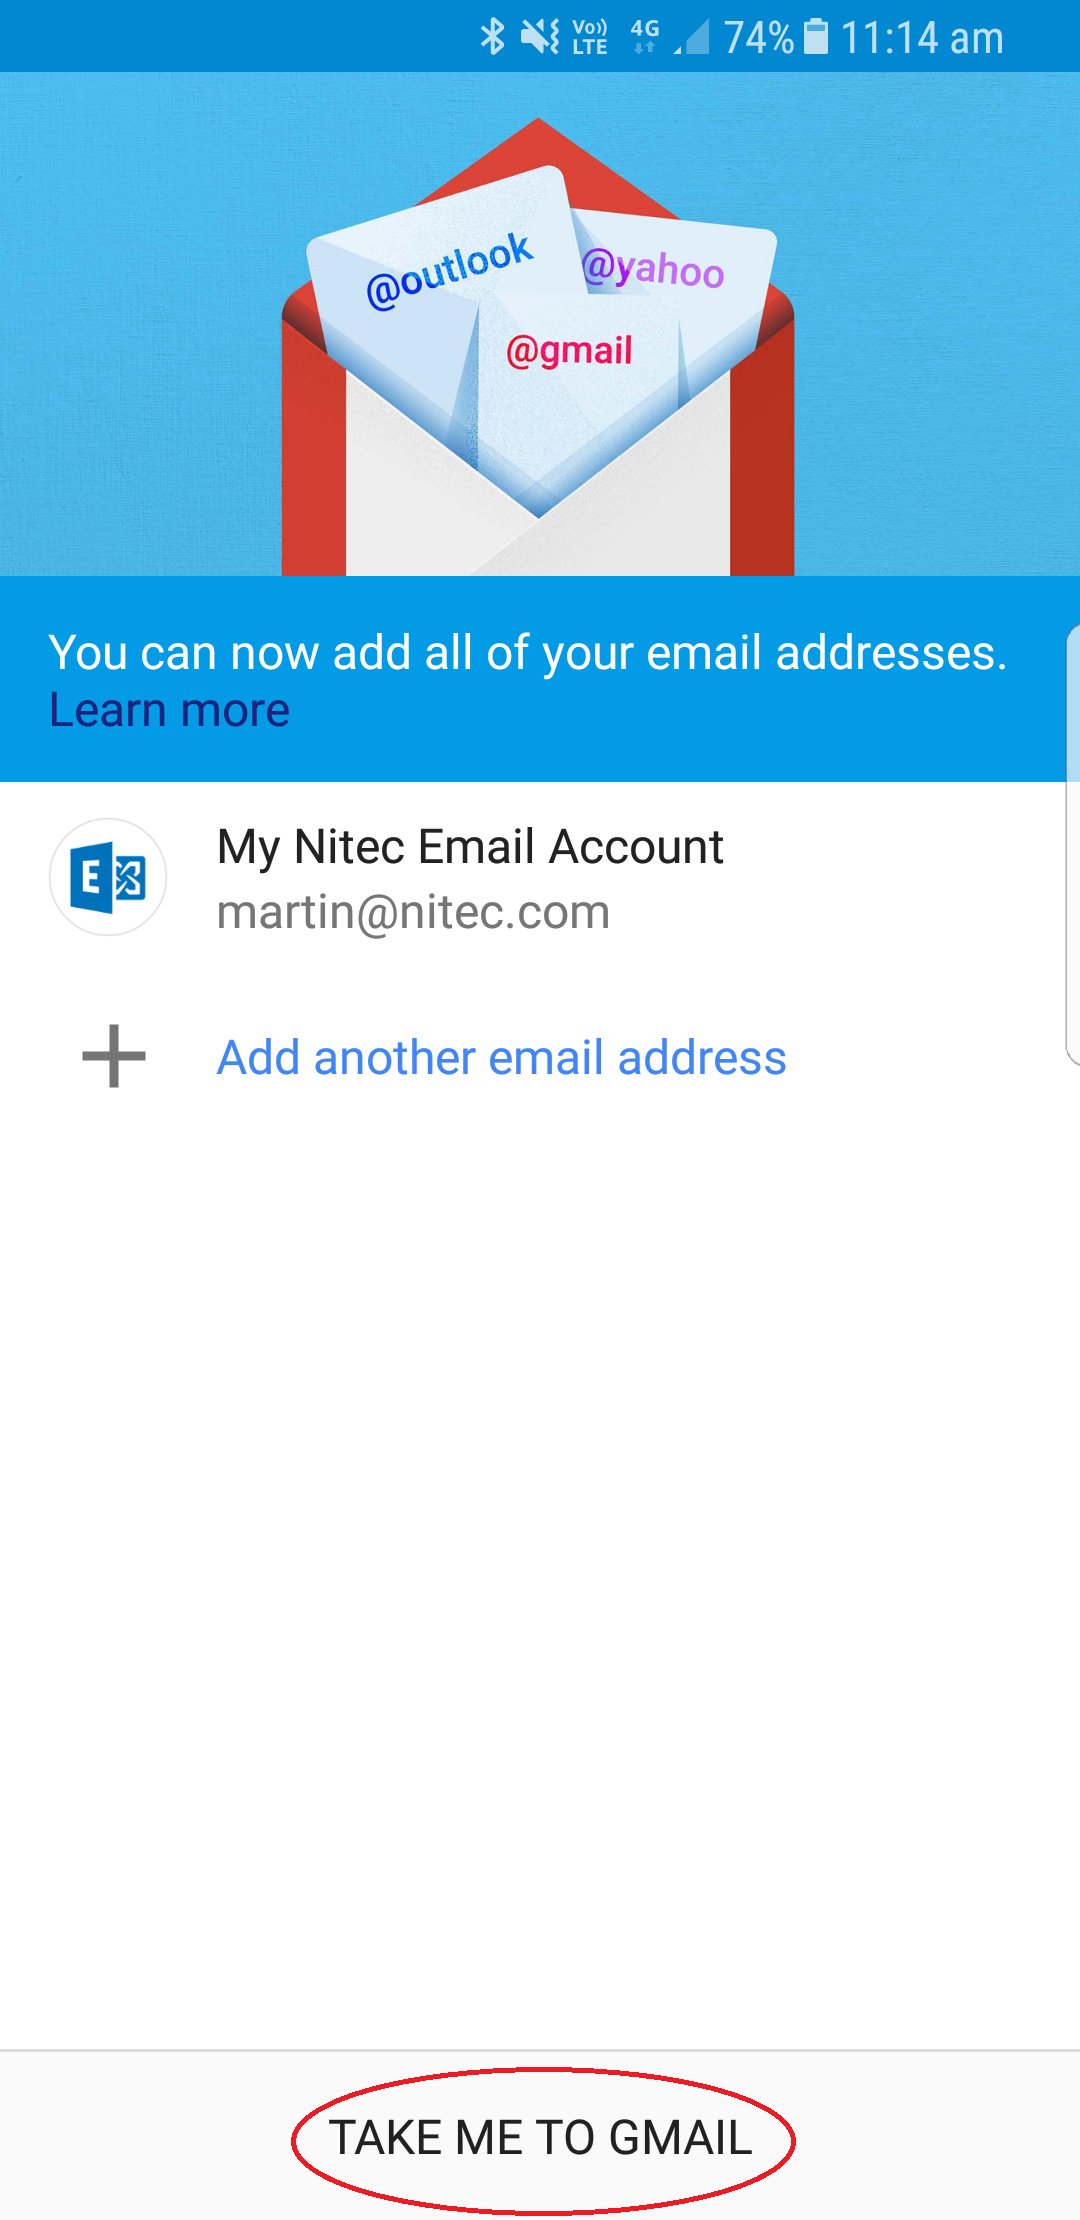
Choose a name for your mailbox - I choose 'My Nitec Email Account'
Select 'Next'
New Account step 11
You may be asked if you want to 'Allow Gmail to access your Calendar' this will just allow for your outlook calender to be synced to your device
The option is Yours
Again select 'Next'